

Android Marshmallow was recently released, and as we've grown to expect, a root method was quickly made available to devices running the brand new operating system. Legendary root developer Chainfire has stated that he's working his way towards retiring from the scene, but he still had enough left in the tank to quickly publish an update to his popular SuperSU root method.
The process is a bit different this time around, which is a result of Google adding extra SELinux policies and expanding a new security feature called Verity. Nonetheless, you can still get superuser access and all of the cool tweaks that come along with it, so I'll show you how to do it below.
Before You Begin
First and foremost, you should know that this root method is only intended for use on devices running Android 6.0 Marshmallow (specifically build MRA58K), and as a result of some changes that have been made, is only available for the Nexus 5, 6, 7 (2013), 9, and Player.
Secondly, you will need to have a custom recovery installed on your Nexus device to use this root method. You can use this guide to get TWRP recovery installed on your device, but it's recommended that you install the latest version, which is linked below for all applicable devices:
- TWRP for Nexus 5
- TWRP for Nexus 6
- TWRP for 2013 Nexus 7 (Wi-Fi)
- TWRP for 2013 Nexus 7 (3G)
- TWRP for Nexus 9
Finally, if you're using a Nexus 6 or Nexus 9, it's highly probable that this method will wipe all of the data on your device. This is because a modified boot image (kernel) is required for rooting Android 6.0, which will disable the default encryption on these devices, rendering any existing data useless and forcing a full wipe. If you've already disabled forced encryption on your Nexus 6 or Nexus 9 and made sure to keep your device decrypted while updating, this won't be an issue.
Step 1: Download Necessary Files
With the prerequisites out of the way, you're ready to get started. First, you'll need to download a custom kernel for your device, which is now a requirement for rooting Android 6.0, since changes have been made to the stock boot image (kernel) that would otherwise prevent rooting.
ElementalX is a rock-solid custom kernel that supports root on Android 6.0 and even gives you a few bonus tweaking options, so it's what we'll be using today. To begin, tap one of the following links to download the ElementalX kernel for your respective device:
- ElementalX for Nexus 5
- ElementalX for Nexus 6
- ElementalX for 2013 Nexus 7 (Wi-Fi)
- ElementalX for 2013 Nexus 7 (3G)
- ElementalX for Nexus 9 (Wi-Fi)
- ElementalX for Nexus 9 (LTE)
Beyond that, all devices can use the same SuperSU ZIP to get root access on Android 6.0. Tap the following link from your Nexus device to grab a copy of Chainfire's root ZIP:
Step 2: Flash ElementalX to Enable Rooting
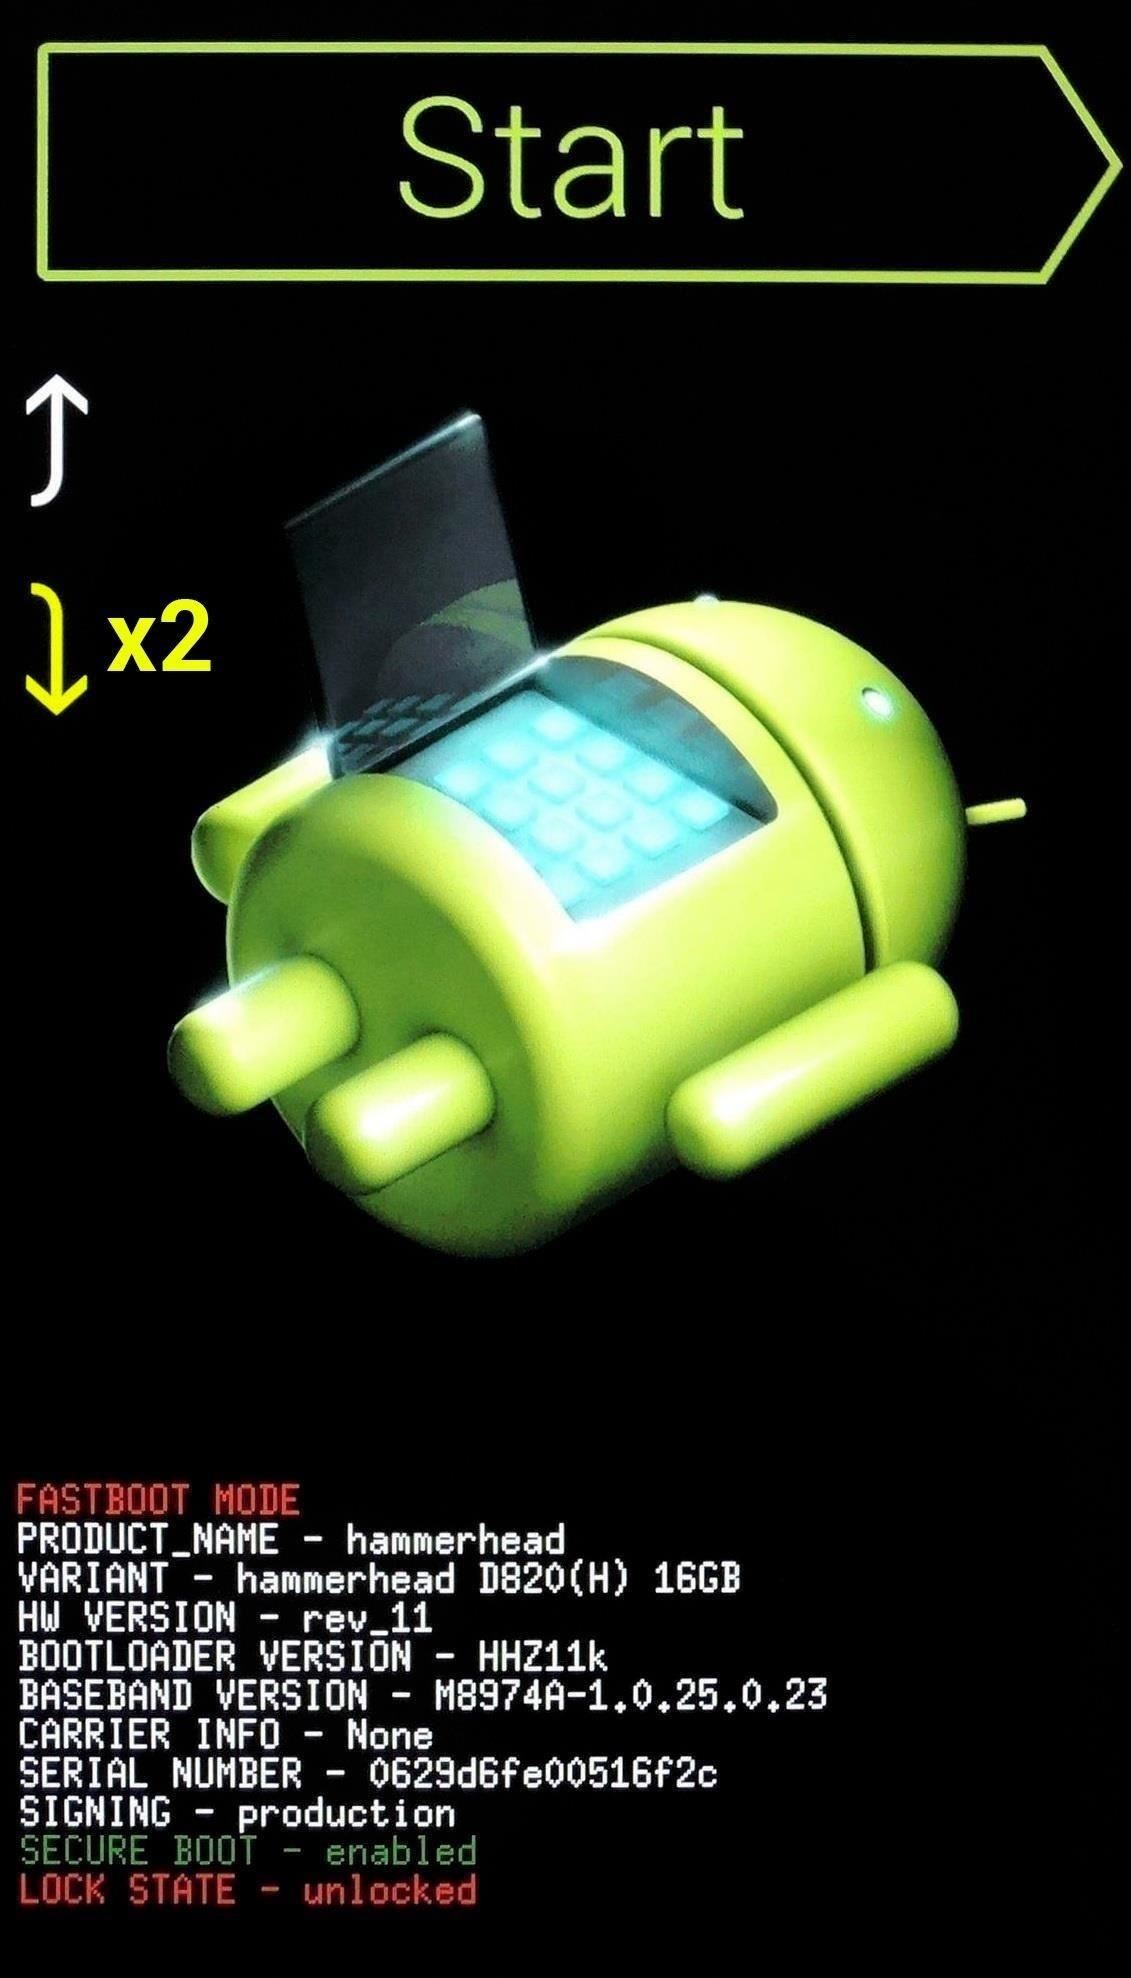
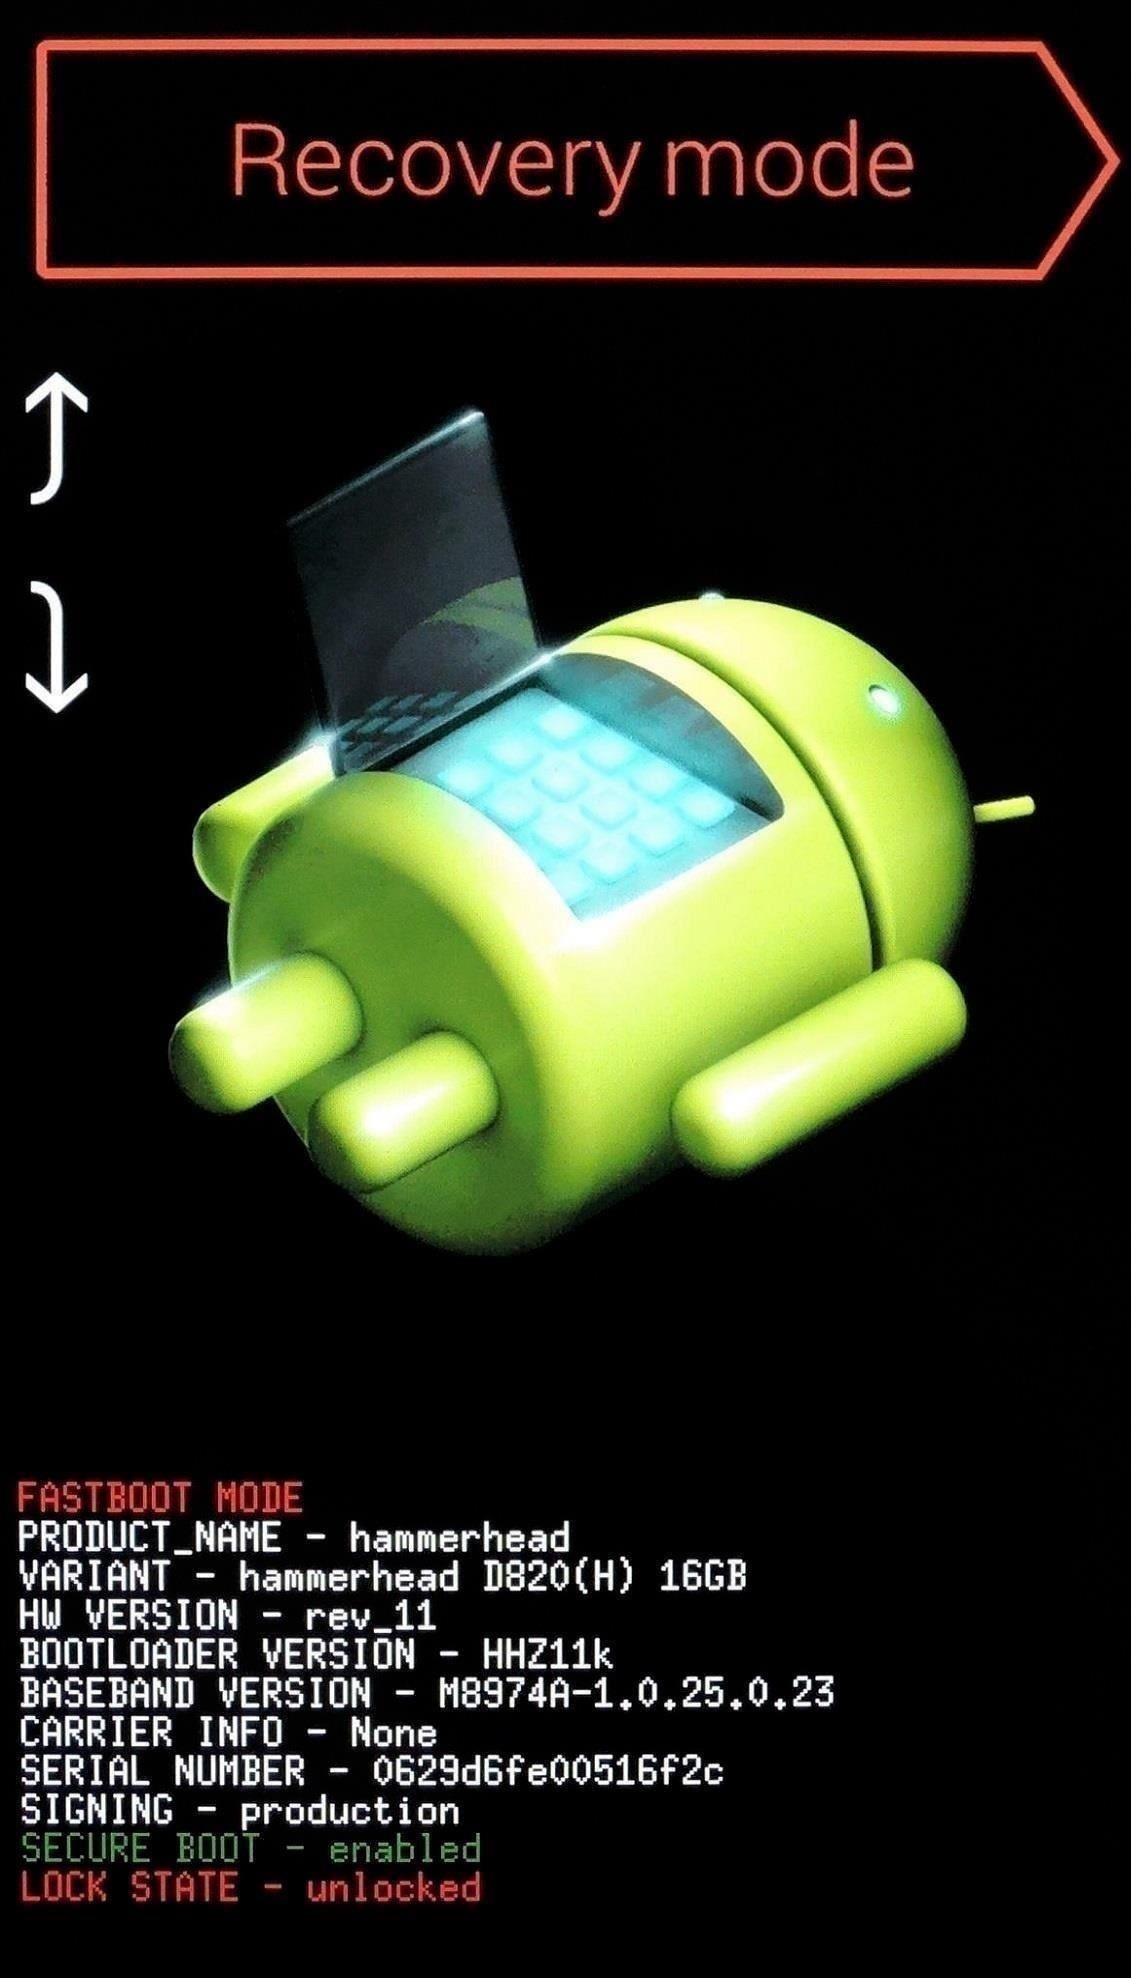
With the necessary files downloaded, go ahead and boot your device into custom recovery. To do that, start by powering your phone or tablet completely off. When the screen goes black, press and hold the volume down and power keys simultaneously to enter bootloader mode. From here, press the volume down button twice to highlight "Recovery mode," then press the power button to select it.
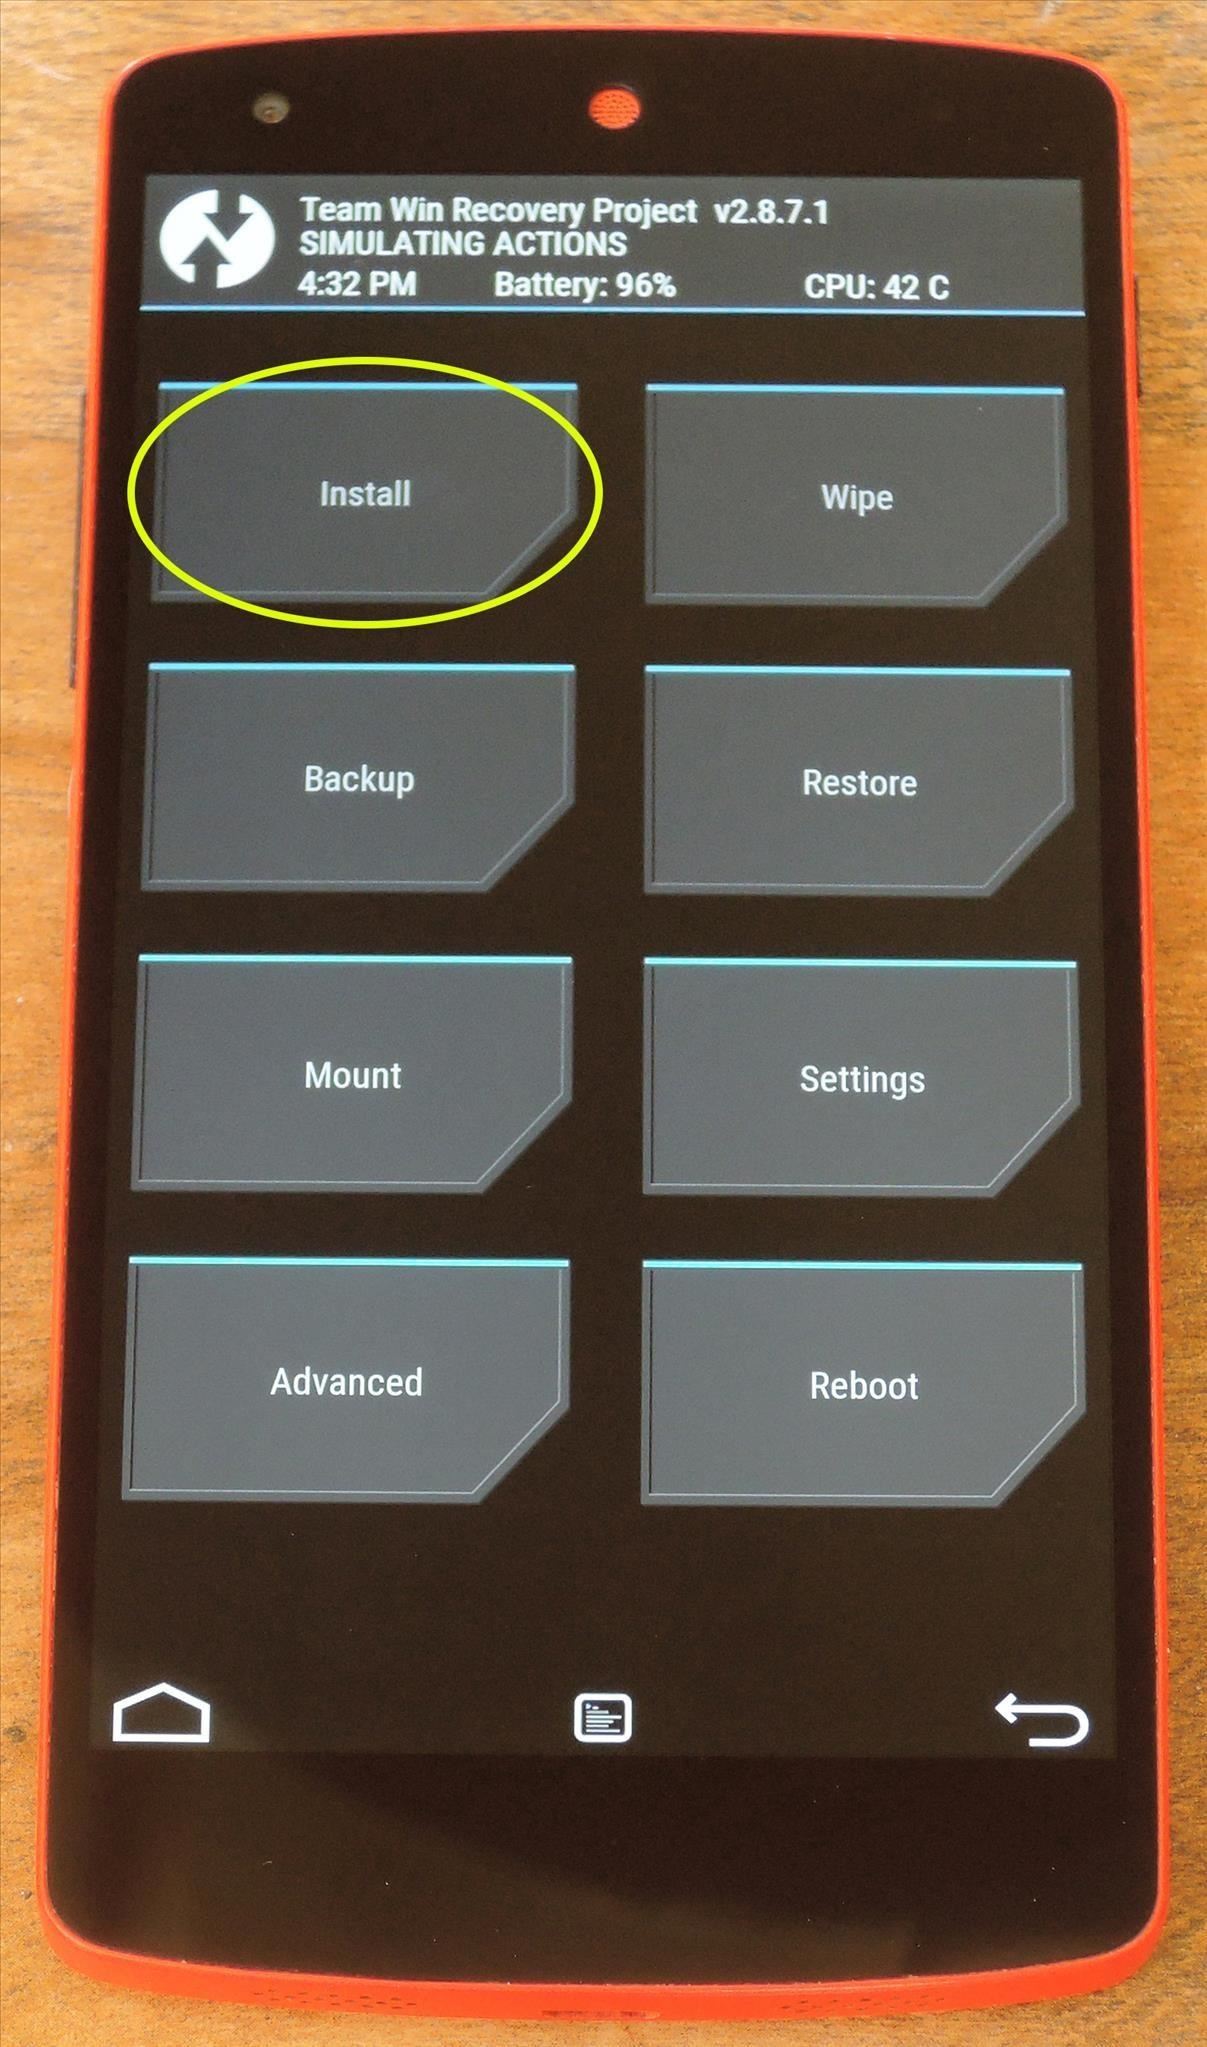
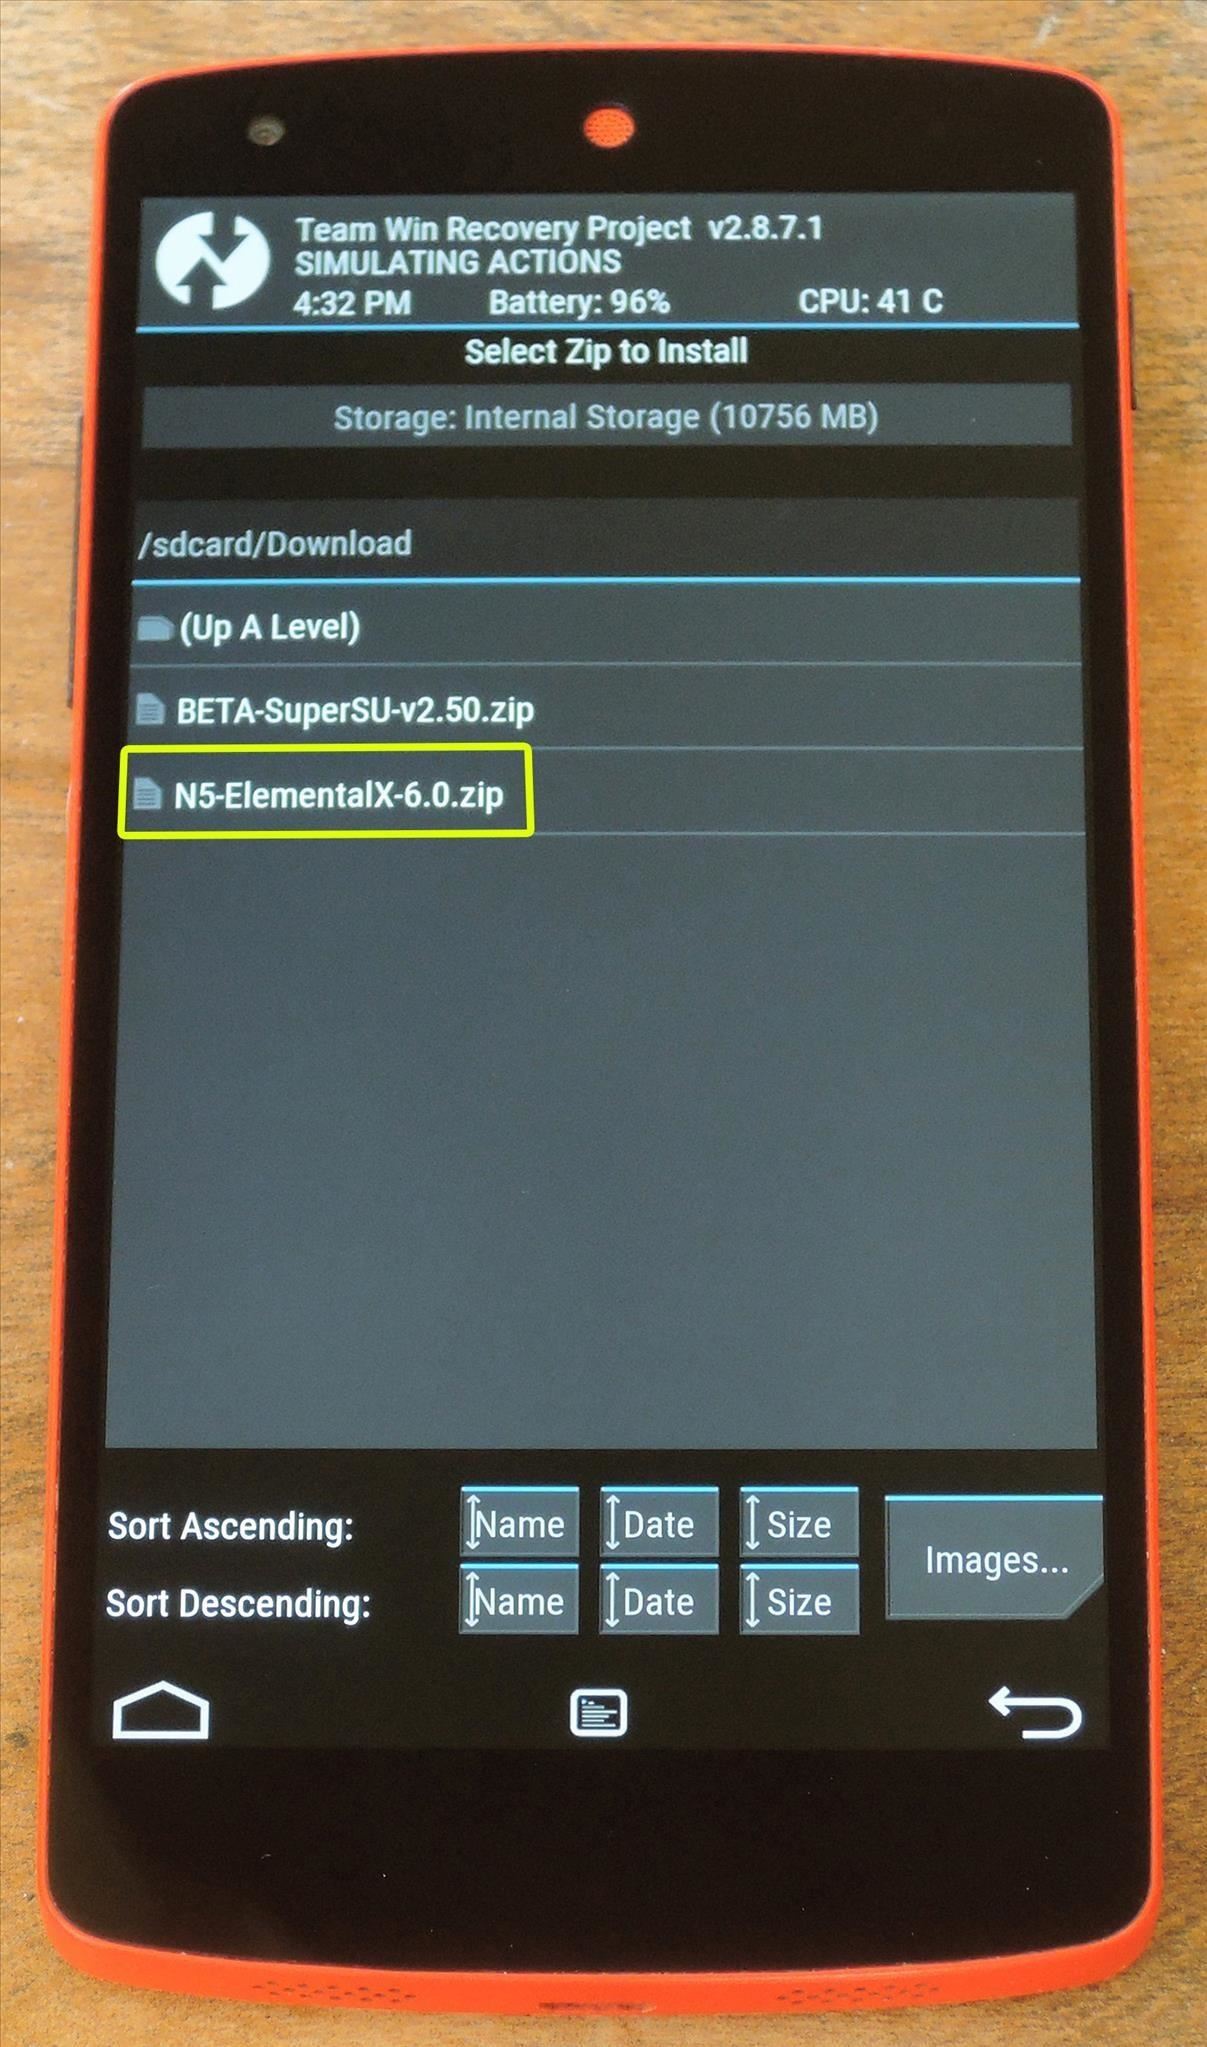
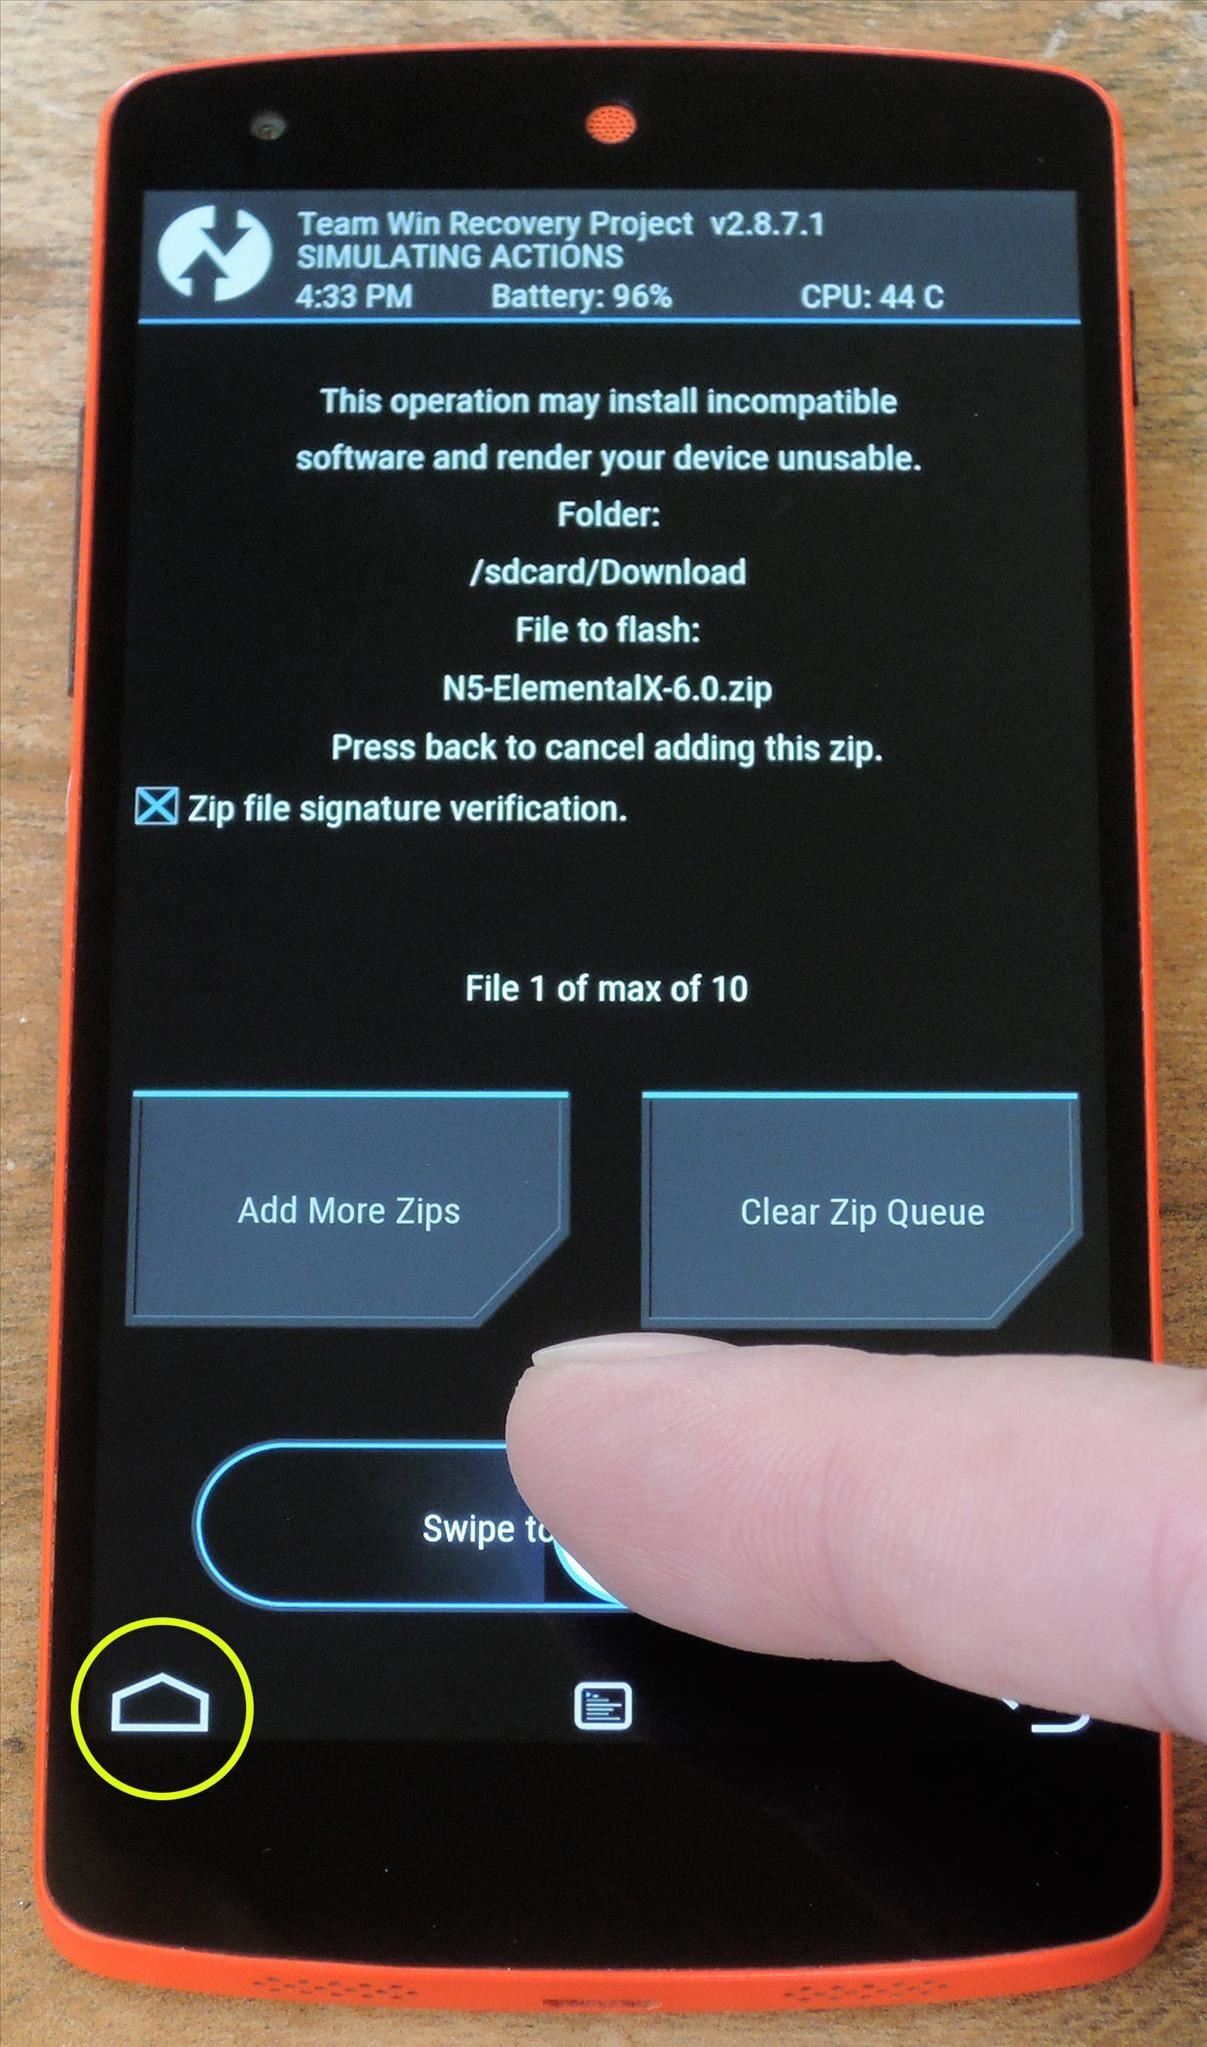
From TWRP's main menu now, go ahead and press the "Install" button. Next, navigate to your device's Download folder, then select the ElementalX kernel file that you downloaded in Step 1. From here, simply swipe the slider at the bottom of the screen to install the kernel, and when that's finished, tap the home button in the bottom-left corner of the screen.
Step 3: Flash SuperSU to Get Root Access
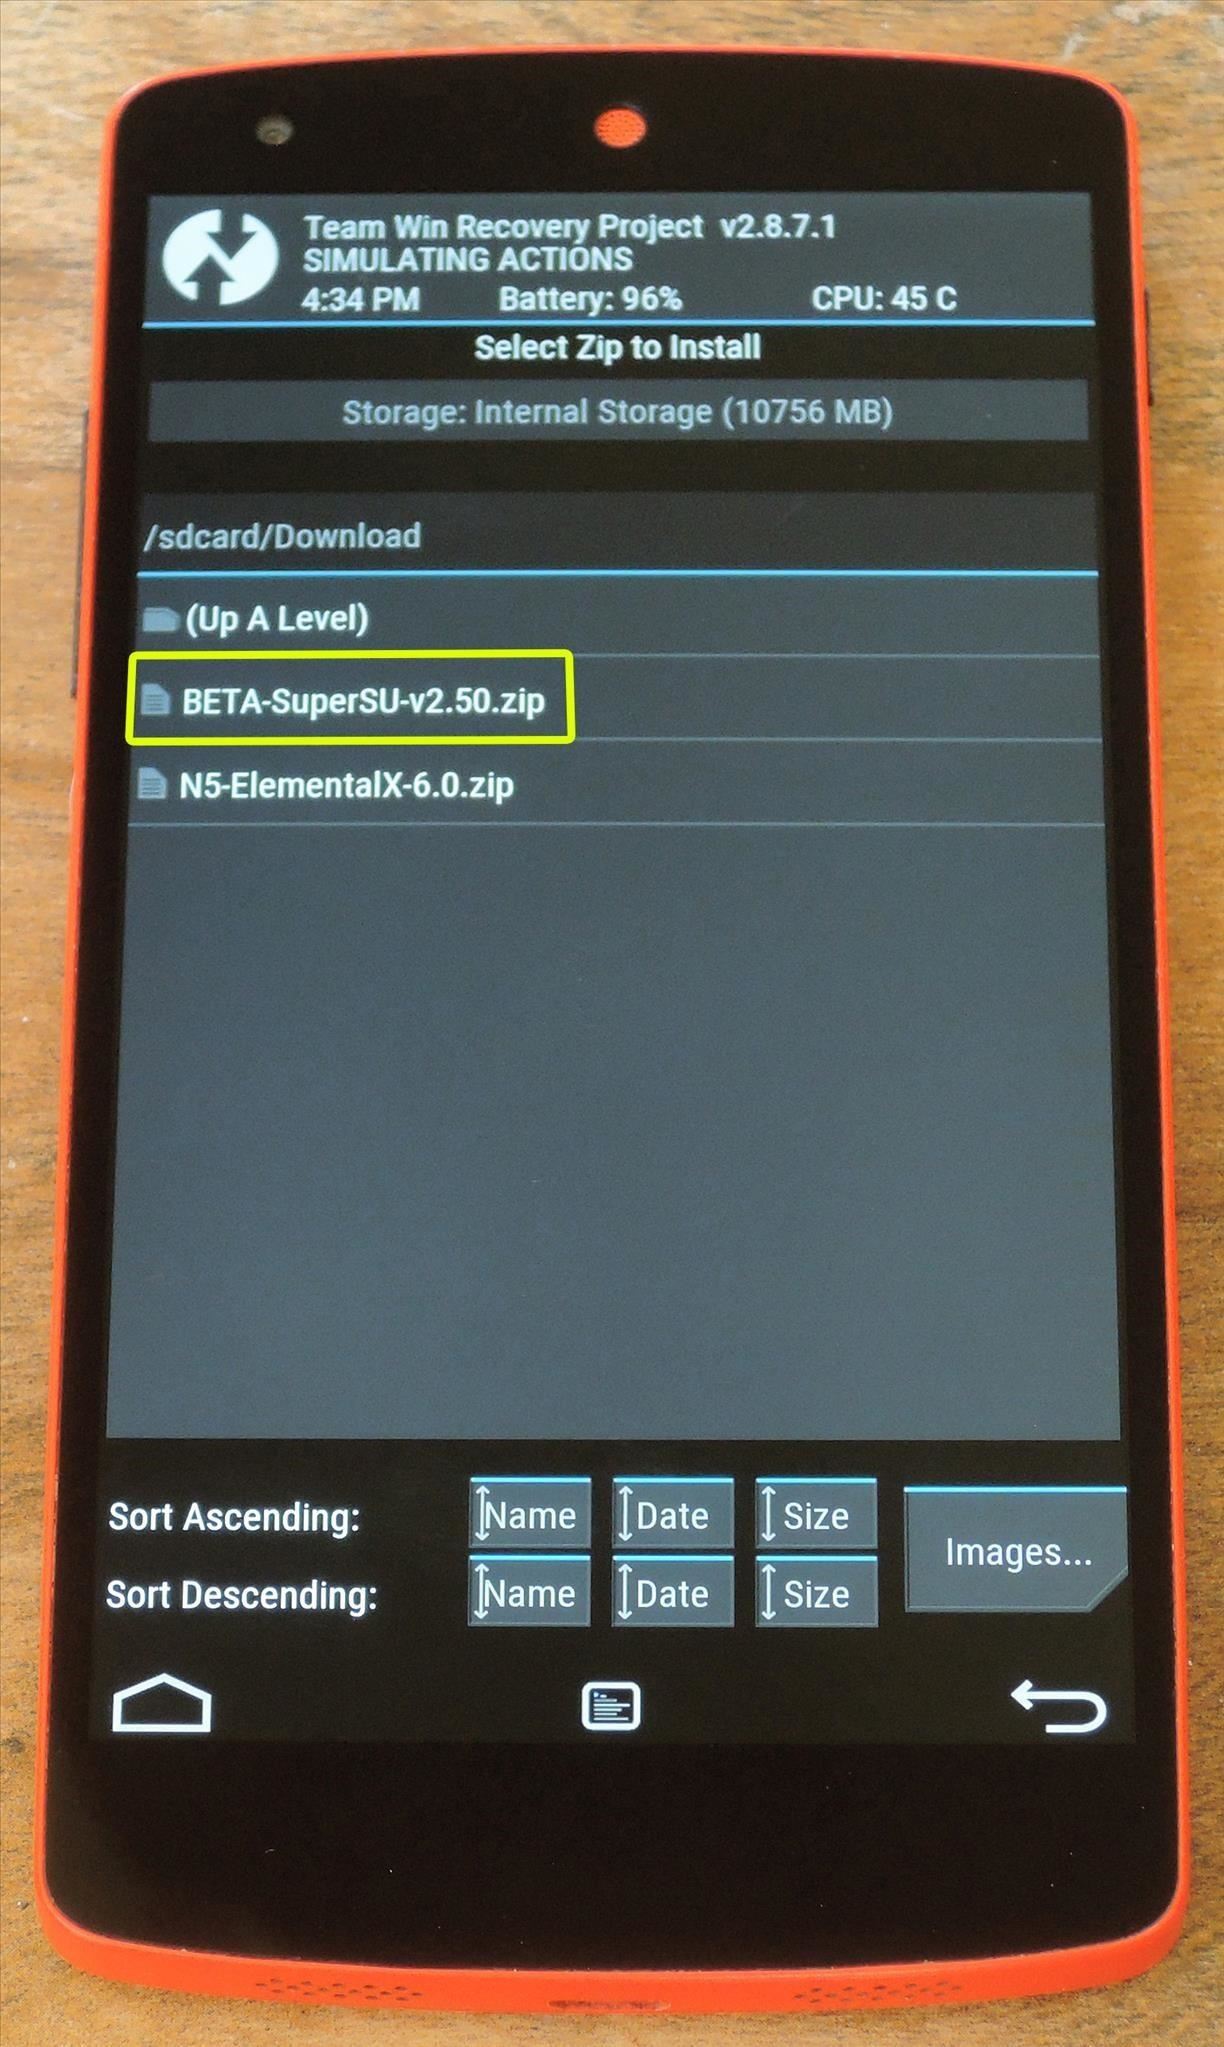
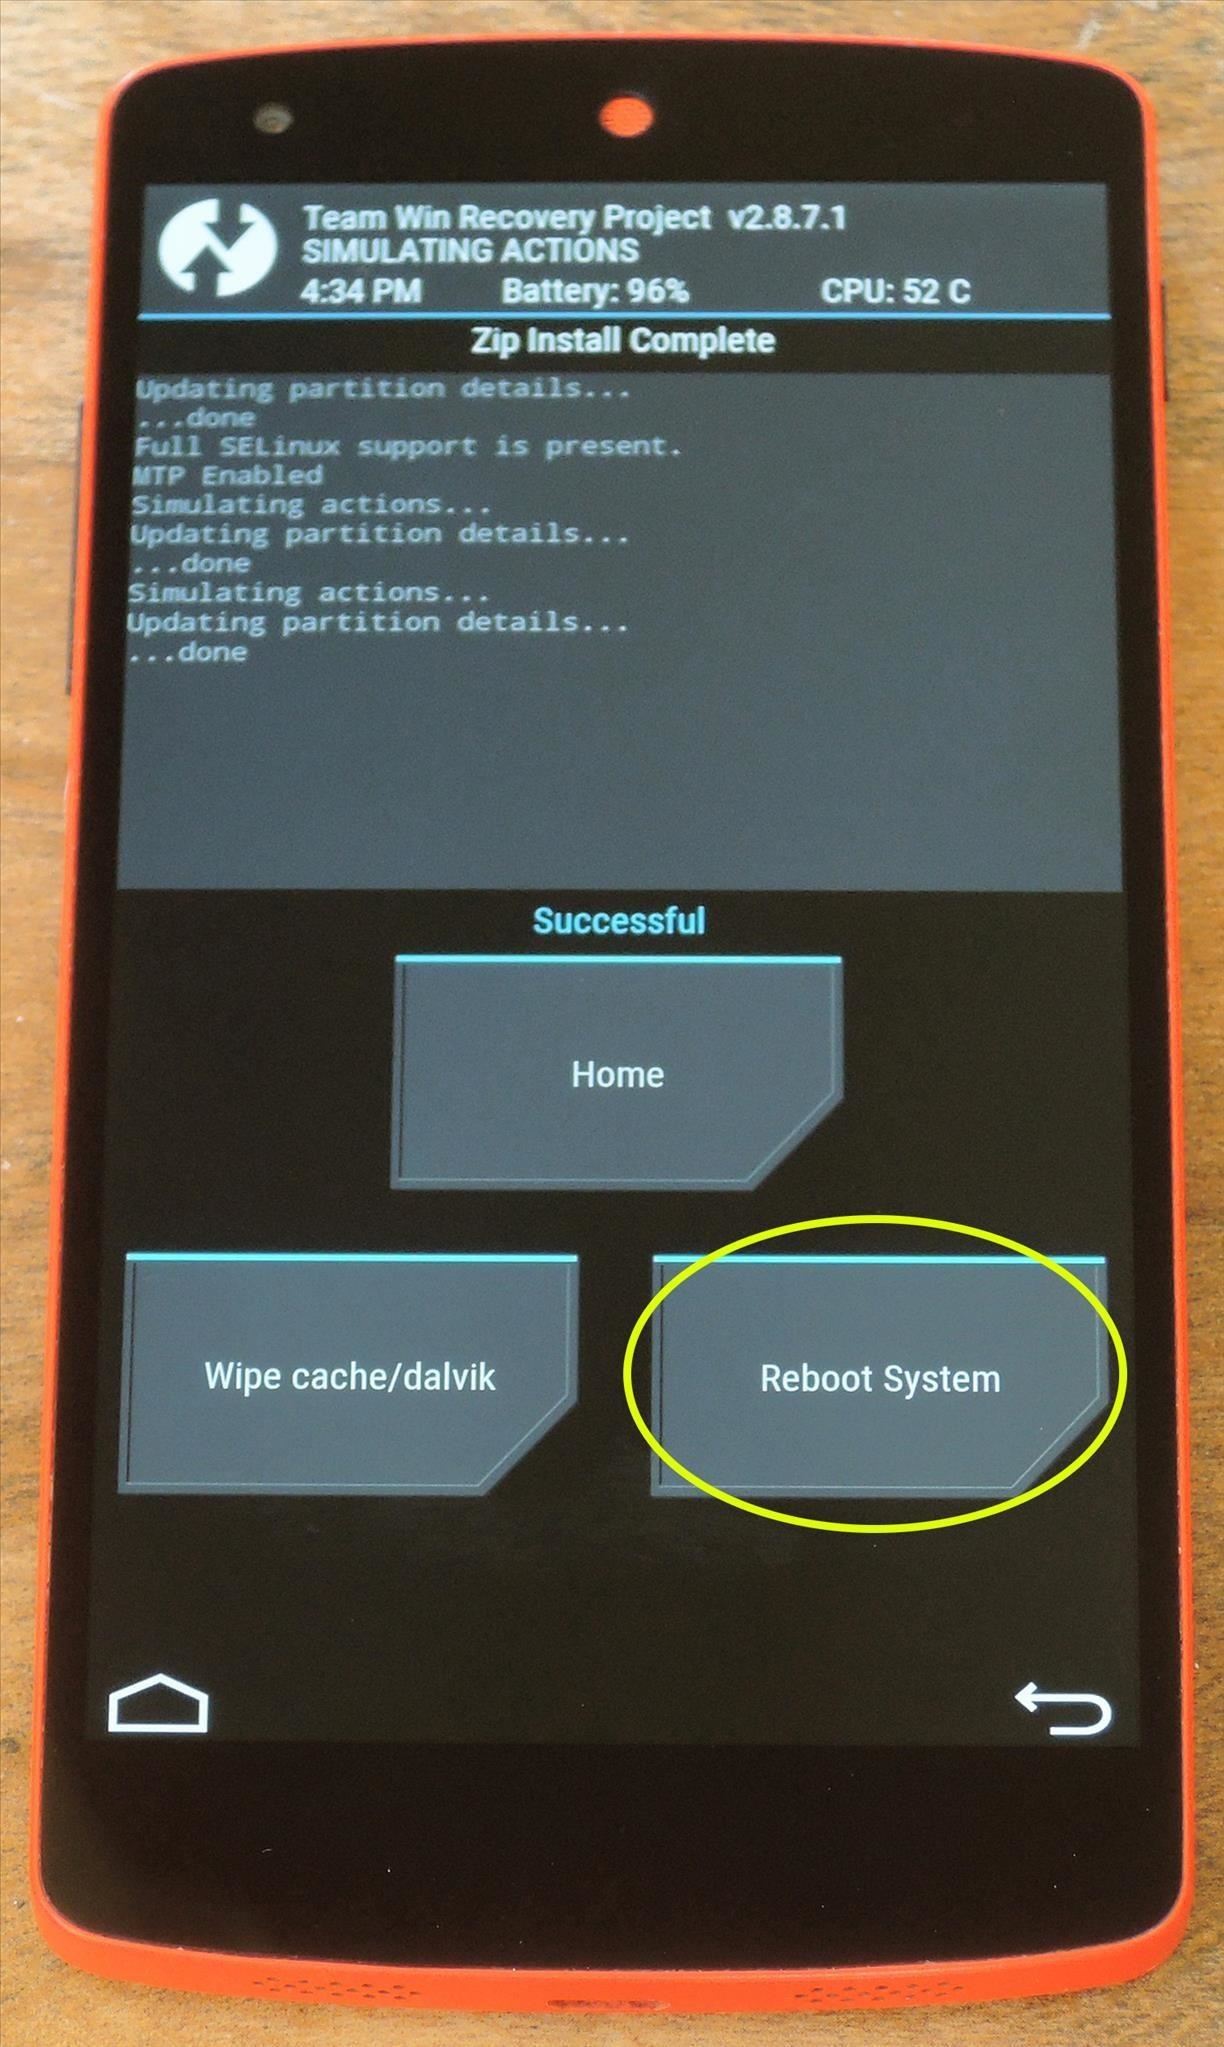
Now that you have a modified boot image/kernel, the rest of the rooting process will be exactly the same as it was with previous Android versions. To begin, tap the "Install" button from TWRP's main menu and navigate to your Download folder again. From here, select the BETA-SuperSU-v2.50.zip file and swipe the slider at the bottom of the screen to install it. When that's finished, tap the "Reboot System" button to wrap things up.

Step 4: Verify Root
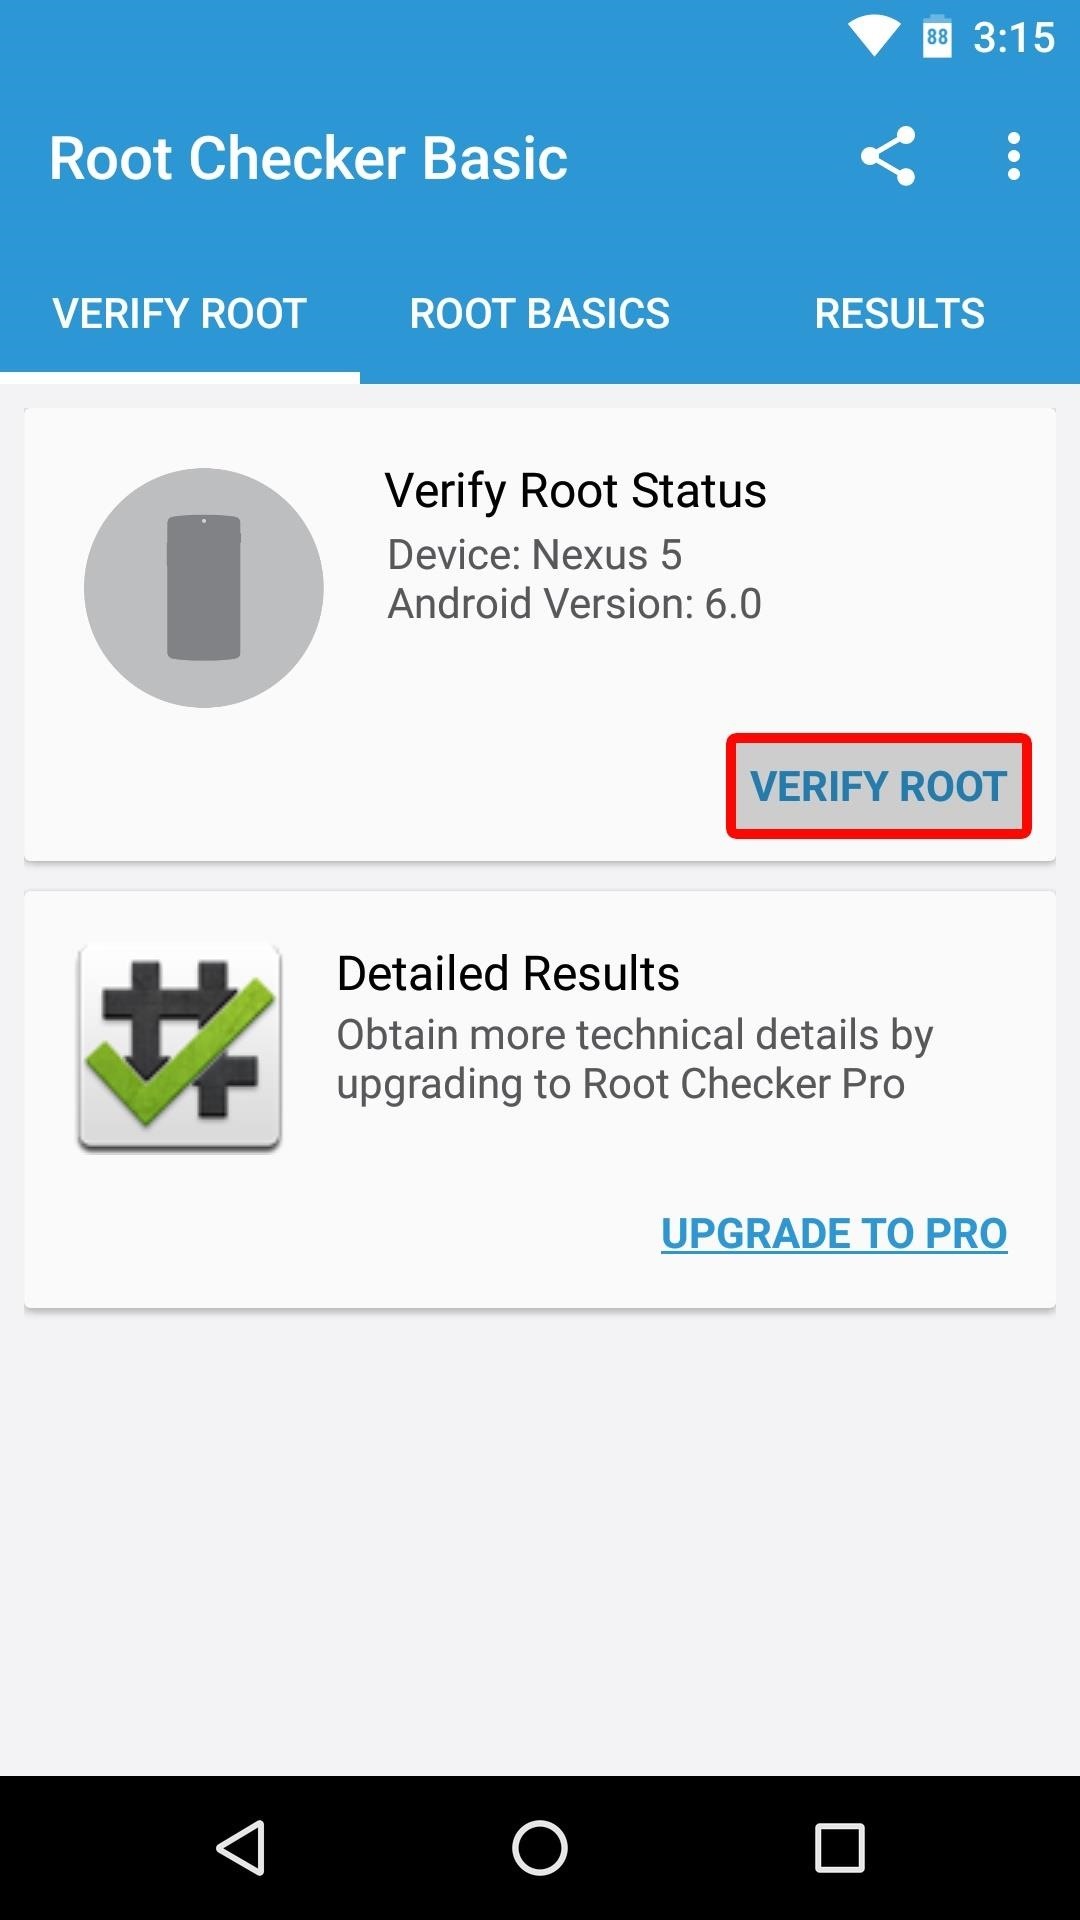
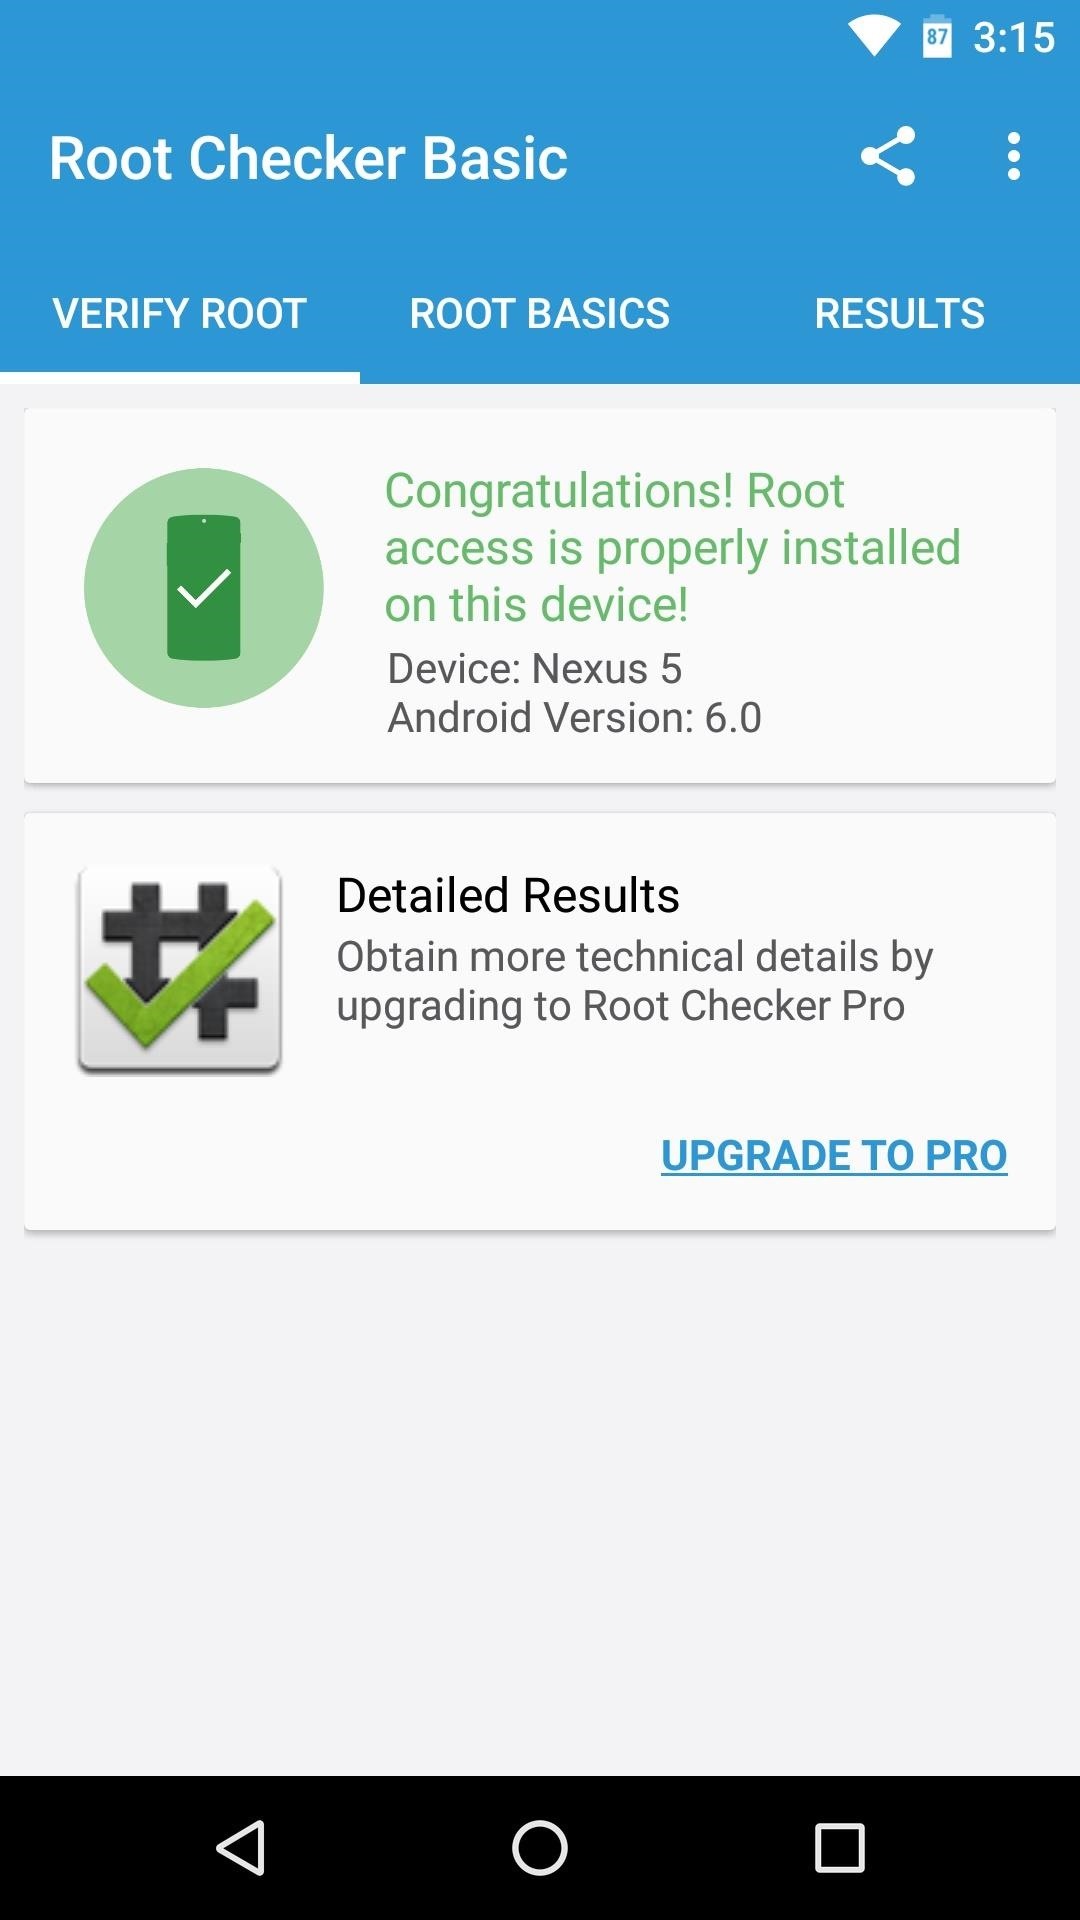
When you get back up, your device should be fully rooted. To verify this, download an app called Root Checker from developer joeykrim.

Once you've installed the app, simply open it up and tap "Verify Root." From here, tap "Grant" when prompted to give the app superuser access, and if everything went off without a hitch, you should see a message saying "Congratulations! Root access is properly installed on this device!"

What are your thoughts on the changes in Marshmallow that require a modified boot image before you can root your device? Is this a sign of Google working towards making root impossible, or is it as innocuous as their stated intent of making Android more secure? Tell us what you think in the comment section below, or drop us a line on Android Hacks' Facebook or Twitter, or Gadget Hacks' Facebook, Google+, or Twitter.
Just updated your iPhone? You'll find new emoji, enhanced security, podcast transcripts, Apple Cash virtual numbers, and other useful features. There are even new additions hidden within Safari. Find out what's new and changed on your iPhone with the iOS 17.4 update.


32 Comments
What am I doing wrong.
I get this error when I try to flash with the downloaded image.
target reported max download size of 536870912 bytes
sending 'recovery' (5 KB)...
OKAY 0.004s
writing 'recovery'...
(bootloader) Invalid boot image
FAILED (remote failure)
finished. total time: 0.011s
Something's not right with that error. Are you're using Fastboot commands to flash the modified boot image? If so, I'd recommend using TWRP to just flash ElementalX, which will give you the same root-ability as the modified boot image, plus you'll need a custom recovery to flash the SuperSU ZIP anyway.
You have to unlock the bootloader first with the following command:
fastboot oem unlock
Otherwise, you get that remote error
After I finished all the steps, I cannot open super su app. And the root checker showed that root access is not properly installed. However, I can use the app needs root access which I granted in 5.1.0, but cannot grant new root access.
Which device are you using? There's a chance that a bug in SuperSU 2.50 caused your issue. Chainfire has since updated the ZIP to version 2.52, which can be downloaded here. I'd say try flashing that by itself if you've already flashed ElementalX or a modified boot image.
I followed all the steps..and after I pressed reboot system..my Nexus 5 phone is stuck in Android Marshmallow loading screen(4 spinning dots) I left my phone like this(while charging)all night and its still this way. HELP! What do i do?
Sometimes it'll hang up on first boot after you've flashed a new boot image, kernel, or bootloader. Have you tried a hard reset? Hold the power button down for 10 seconds until it starts to reboot, then see if it finishes booting up this time.
I'm having the same problem on my nexus 7 2013, luckily I had made a backup but I still want to root.
Since you have a backup, try clearing cache and dalvik in recovery. If you're using TWRP, go to Wipe, then Advanced Wipe, then select only Cache and Dalvik Cache and swipe the slider. That may fix it, or it may just be that the beta version of SuperSU is still having some bugs.
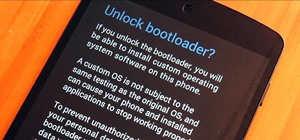
hi. all went well until i rebooted my nexus 6. it said something like "your device is corrupted and it would not work properly". after a few seconds it started ok. no data lost. is it going to be a problem? please note that i DID NOT disable forced encryption. is that the reason?
That's a new thing in Marshmallow, I think. Did it look like this?
If so, that's supposed to be there. It's not showing up for me on my Nexus 5, but I think newer devices like the Nexus 6 will have this screen if their bootloaders have been unlocked, if you've rooted the device, or if you've installed a custom recovery.
How do I get elementalX and supersu onto my phone if after i installed twrp recovery, my phone keeps restarting, or I can make it go into bootloader mode. Other than that i can't do much else.
I saw your response in the other article, and it looks like you may be having some issues with the TWRP installation. I've messaged you through the site, and I'll be around for another 8+ hours, so get back with me if you can.
thanks dallas thomas . working just fine for me . actually i've try rooting my phone using stock kernel . it's so frustrated coz it wont boot up . thank god i read your post . keep this good job bruh . appreciate it
So I installed Marshmallow on my Nexus 6 and mistakenly tried to root with CFAutoroot. This was unsuccessful and I am getting an error message on start up saying the device is corrupt, cannot be trusted and may not work properly. Link shown is G.co/abh. So then I reinstalled Marshmallow and tried to root with the new ElementalX for Nexus 6 and SuperSU 2.52 For Marshmallow. Checked root and it was successful. Then when I tried to enable tethering by adding the line net.tethering.noprovisioning=true in the buildprop it failed when trying to save. Suggesting the phone is not properly rooted.
Now trying to reinstall marshmallow again to get rid of the error message thinking that has something to do with it.
Any suggestions would be greatly appreciated!
Thanks!
I've seen that same error message when trying to edit my build.prop, but after researching, I found out that it's the file explorer/build.prop editor that's having issues, not root. Basically, some apps just need to be updated to support all root actions on Marshmallow. I know Root Explorer just got an update that fixed the issues when trying to edit system files on Marshmallow, so that's a possibility if you want to give it a try.
But the error message you're seeing on boot is something we're just gonna have to deal with from now on. Google started including 3 of these types of messages, and they appear when your phone is modified in any way. So there's nothing wrong, actually—it's supposed to show that message if you've rooted or unlocked your bootloader. But it definitely is annoying.
Awesome! I made my first rooting into Android 6.0. It is bit long procedure and made me to install my OS twice and finally I made it. Thanks for the tuto! It is really clear n usefull.:)
May i know if this steps work for my nexus 7 LTE currently running android 6 MRA58V?
Yep, this should work for that device. If you want to be extra safe, make a NANDroid backup right after you install TWRP by tapping "Backup," then swiping the slider at the bottom of the screen. From there, if anything goes wrong, you can simply boot into TWRP, then tap "Restore" and select your backup to get everything back to normal.
hello,
after I select the recovery mode all I receive is " no command". please where did I go wrong. I have a nexus 5 and android 6.0
Somehow, you still have the stock recovery installed and not TWRP. That could happen as a result of many things, so I'm not entirely sure where things went wrong.
Luckily, though, nothing's really changed so far, so you're all good. I'd say to run back through the steps in the TWRP installation article again (here's the link), but pay close attention when it comes to sending the "fastboot oem unlock" command. If your phone doesn't display the menu shown there, something might be wrong with your drivers or ADB installation. If it does and you can unlock your bootloader just fine, make sure that the "fastboot devices" command in the next step spits out a series of letters and numbers. Beyond that, make sure to follow the last step in that article closely and you should be good to go.
i have nexus 5 with latest build of MRA58N with latest android 6. i tried to follow this steps but its not working. can anyone help me to do it from start? i have doubt if i am doing wipe correct or not. also how remove img and add new one.. it will be really helpful and appreciated
Do you already have TWRP installed? If not, you should start with this article. If you already have TWRP installed on your device, all you have to do is download ElementalX and the SuperSU ZIP, then boot into TWRP and flash both files.
As someone has asked, how do I get ElementalX and SuperSU into the tablet (Nexus 7, 2013 LTE) after I installed "twrp-2.8.7.1-deb.img"? I get the twrp menu, but I can't access the device via win10?
Do that before you boot into bootloader mode by viewing this article from your tablet and downloading the two files. If you've already installed TWRP and made sure to make it your permanent recovery, go ahead and boot into Android to download the files.
When it boots in shows the teamwin logo, with blue background the shows some lines of text and reboots again and so on. If go to recovery mode then the TWRP menu appears. I'm thinking of getting a USBreader with SDcard and then put the files on there, don't know if that would work?
That sounds like what happens when TWRP and the stock recovery get caught in a loop of overwriting eachother. I think the only way around that is reflashing the stock recovery image, then flashing TWRP again. Only this time, make sure that you boot into TWRP immediately after fastboot flashing TWRP. On first-run, TWRP should ask you to "Swipe to allow modifications," so make sure you see that menu and swipe the slider. If it doesn't show up, tap the "Advanced" button on TWRP's main menu, then choose "Allow System Modifications" and swipe the slider. If you do that, TWRP will insert itself as your new permanent recovery and successfully overwrite the stock recovery, which should allow you to proceed as depicted in this article.
How do I reflash the stock revocery image? I'm a newbie..
Ok, I'll try to do that. Cheers
so i reached the step where i had to press the volume button to select recovery mode.. but when i press the power button like you said to select it my andriod turns off and says no command.. i do no how to get out of the no command part but i still cant select recovery mode it just takes me back to the no command thing
Please help!!! Nexus 6 running marshmallow. everything went well , installed twrp swiped to make it permanent, then when i went to install the elemental and super user files they are gone. i seen you told someone to to just boot back up then down load files again but i cant get it to boot up. it says your device is corrupt push power button to stop booting. so how am i supposed to put those files on to finish this???
I ve done unlocking for rooting my nexus5 (Marsh.)but while the TWRP installation the teamwin (blue screen ) comes & instead of TWRP main menu my device reboots ..please help !
Share Your Thoughts