

Google I/O is like Christmas for Android enthusiasts. Every year, this conference showcases new and upcoming features for the world's leading mobile operating system, and this year's was no different. Shortly after announcing Android M, Google released a preview version of the upcoming firmware for Nexus devices.
We've already covered a method to install this new preview build on Nexus devices, but that one required a Windows PC. For Mac and Linux users, the "Fastboot" method is the way to go, and I've got a step-by-step guide on this process waiting for you just after the jump.
Before You Begin
This new preview build is only available for the Nexus 5, Nexus 6, Nexus 9, and Nexus Player. It doesn't require root to install, but you should be aware that you will lose root and all of your data if you install this build.
The following guide is meant for Mac and Linux users, but it will also work on Windows computers. If you want an easier way for Windows, check out my guide on installing the Android M preview using the Nexus Root Toolkit.
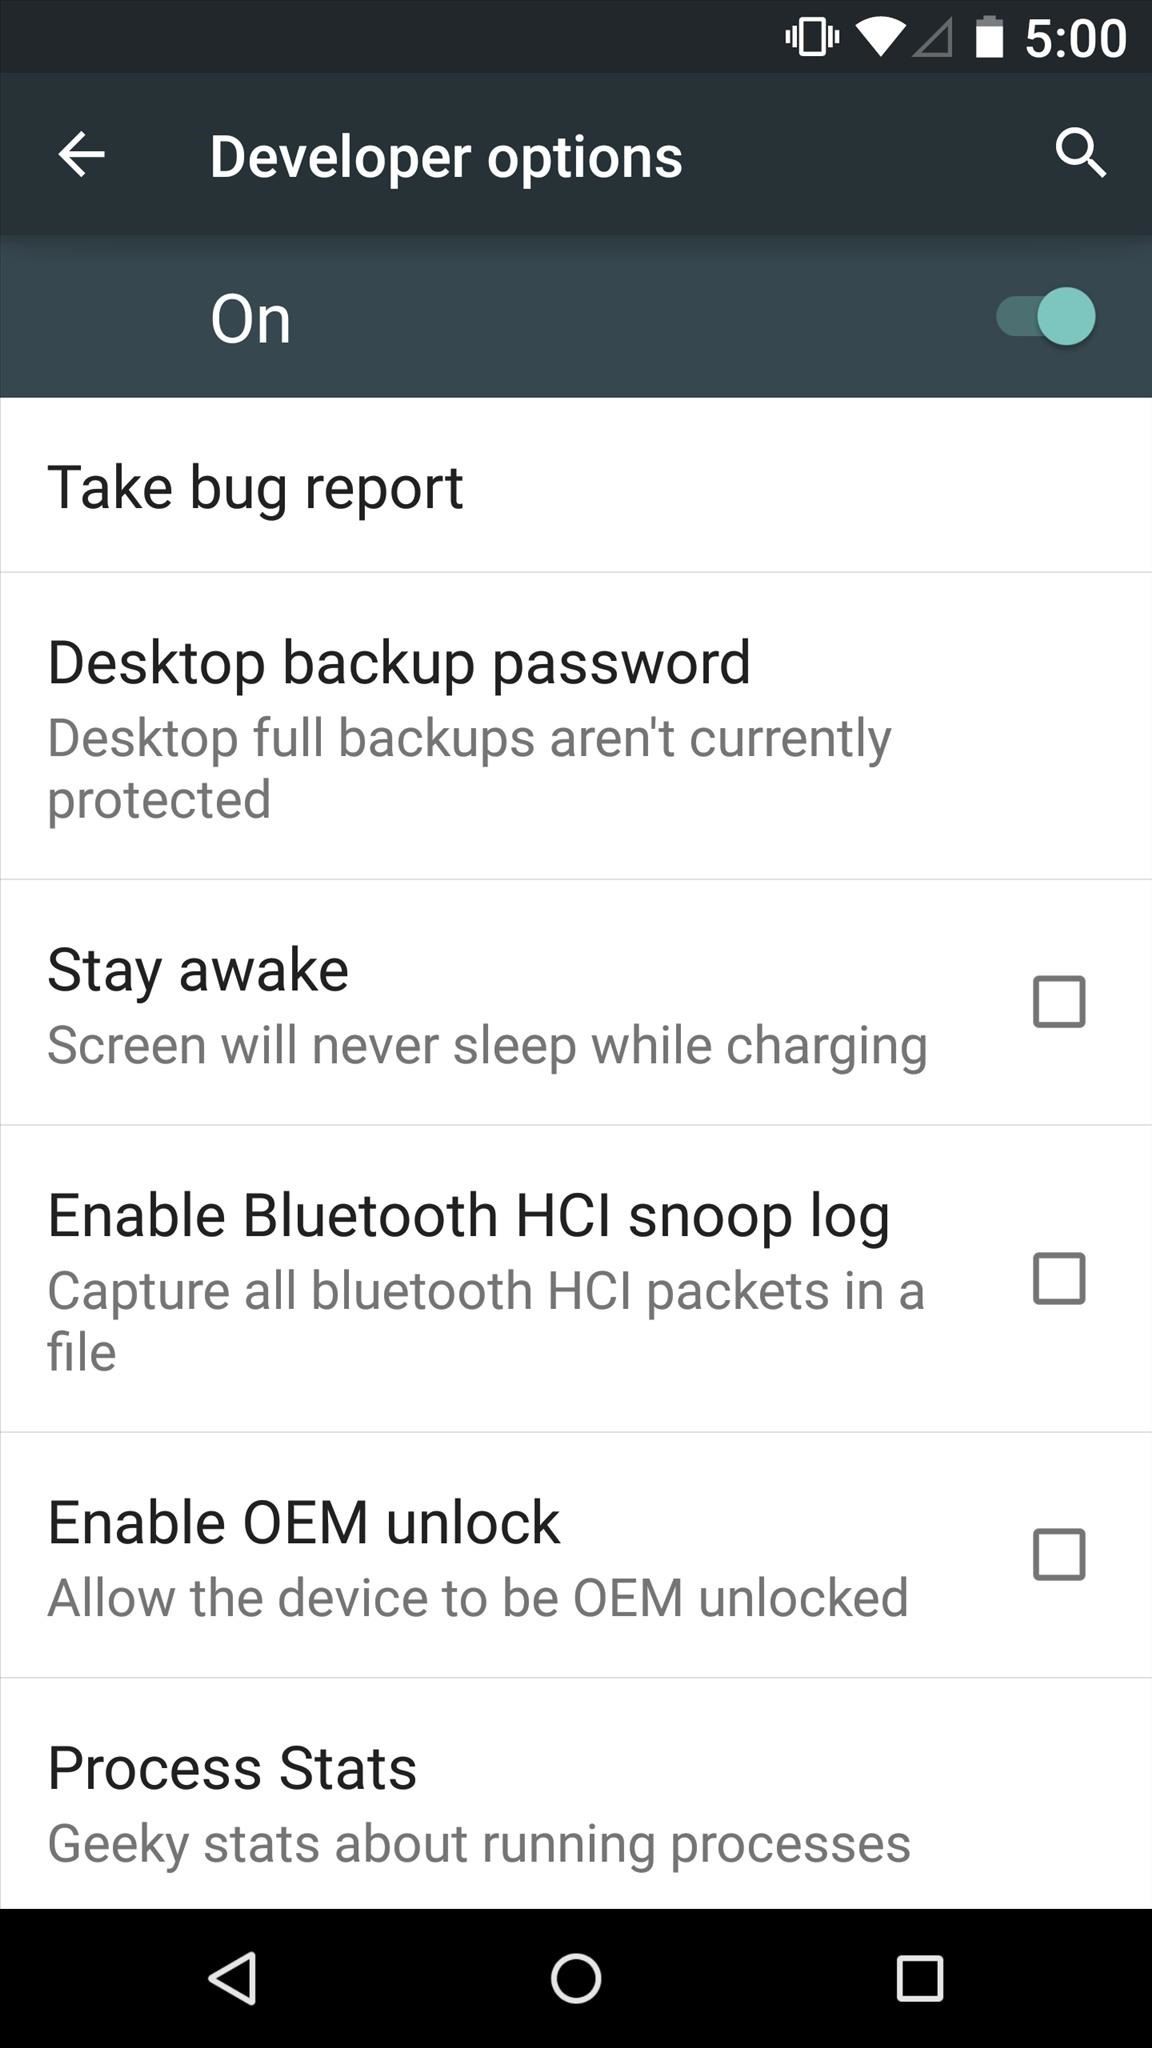
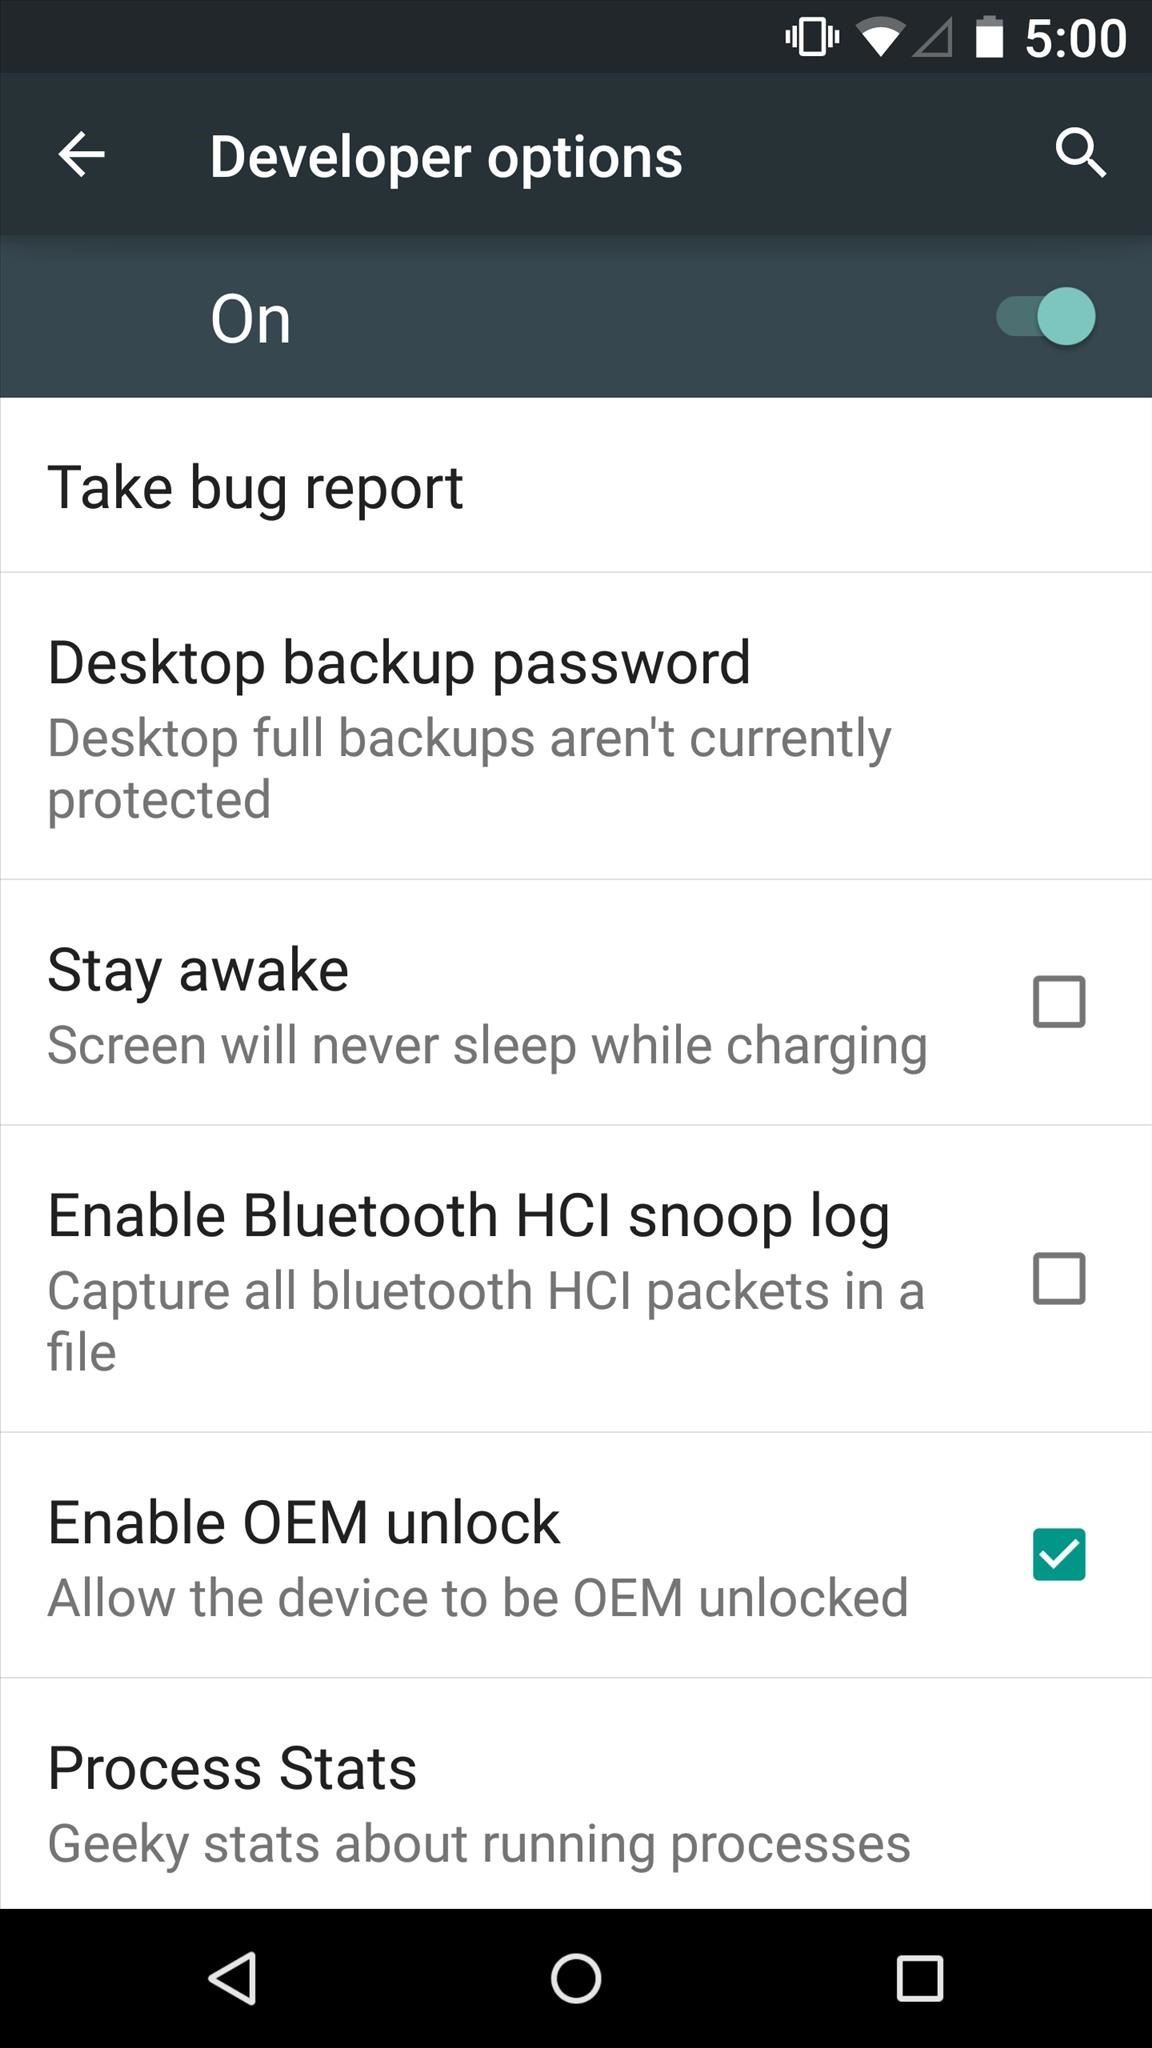
Step 1: Enable OEM Unlock (Nexus 6 Users Only)
Nexus 6 users should first enable the "OEM unlock" option in the Developer options. (If you don't see this menu option in Settings, here is how you unlock it.) Simply tick the box next to "Enable OEM unlock" and you'll be ready to go.
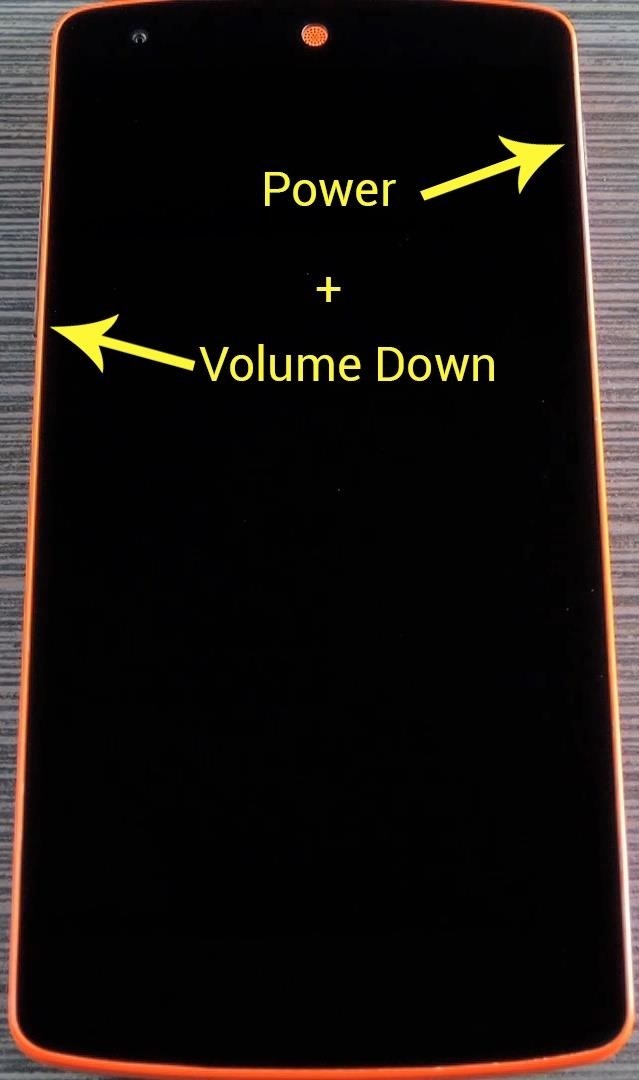
Step 2: Put Your Nexus in Bootloader Mode
You'll need to boot your device into Bootloader mode, so power your Nexus completely off. When the screen goes black, press and hold the volume down and power buttons simultaneously. Once the Bootloader menu comes up, go ahead and connect your phone to your computer with a USB data cable.
Step 3: Install the Android SDK on Your Computer
Over on your computer now, you'll need to grab a copy of the latest Android SDK. Head to the official site at this link to download the file for your particular operating system.
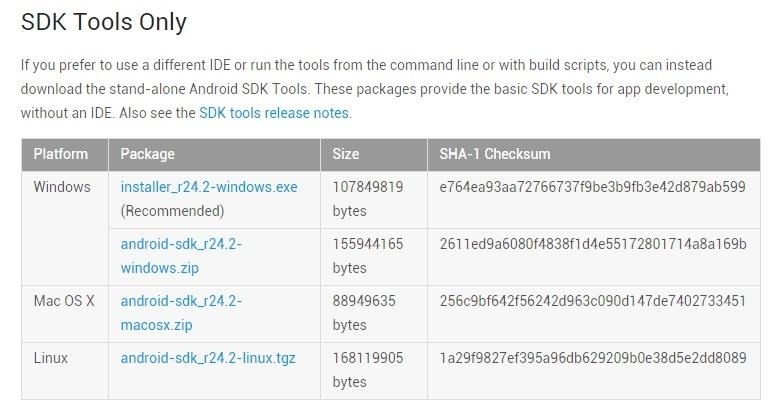
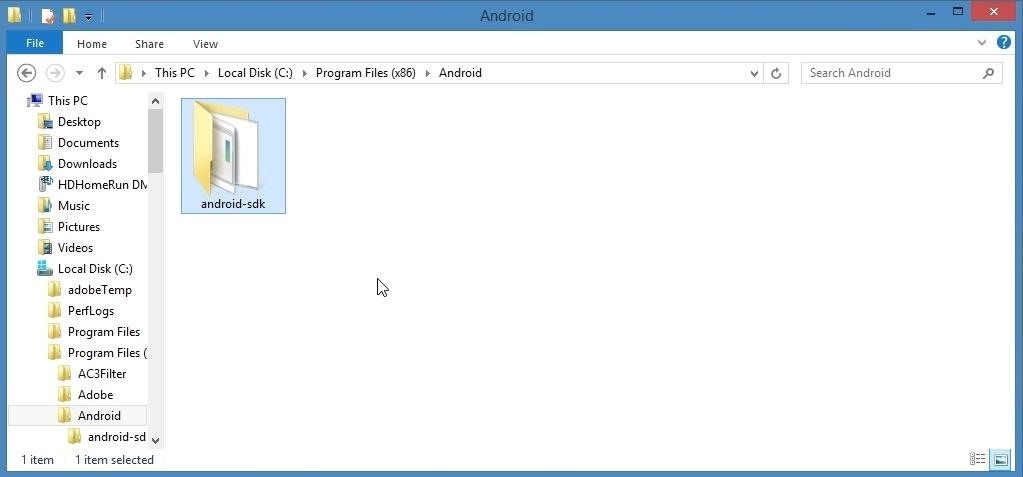
The install process will vary depending on your operating system. Windows users can simply launch the EXE file to install the full Android SDK, which will be saved in the C:\Program Files (x86)\Android\ folder. Linux and Mac users will have to extract the contents of the ZIP to a folder that can be accessed easily. Take note of this folder's location, as you will need to copy some files here later.
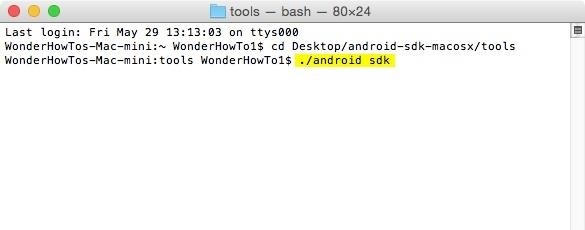
From here, if you're using a Linux or Mac machine, open a terminal window and change directories to the /android-sdk-linux/tools/ or /android-sdk-macosx/tools/ folder that you just extracted. Next up, type android sdk (Linux) or ./android sdk (Mac) to launch the SDK Manager.
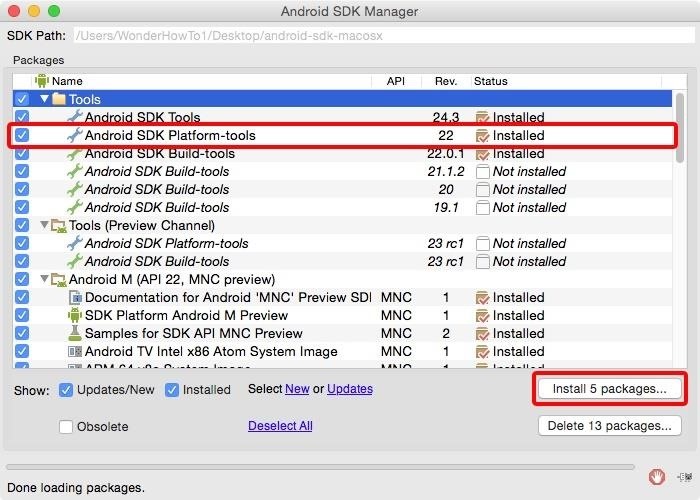
After that, you'll need to download the Platform Tools package if you're using a Linux or Mac computer. Select the "Android SDK Platform-tools" option, then click the install button to take care of that.
Step 4: Install ADB & Fastboot on Your Computer
Next up, for your computer to be able to fully interact with your Nexus, you'll have to make sure you have the ADB and Fastboot drivers installed on your system.
Windows Users:
If you own a Windows PC, you can download the drivers at this link. Just run the file, then follow the prompts, and you'll be good to go.
Linux Users:
If you're a Linux user, download and extract this ZIP file, then run the script with Terminal.
Mac Users:
For Mac users, the process of installing the proper drivers is a bit more involved. Please see our guide on the topic for more information.
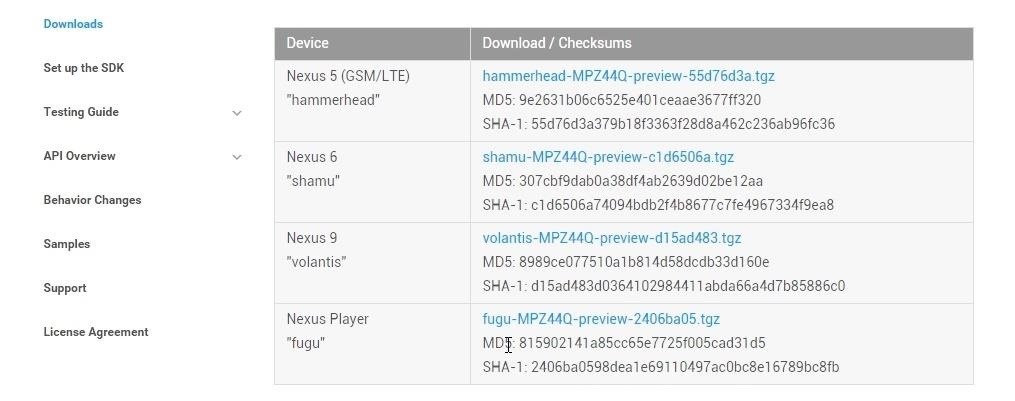
Step 5: Download the Android M Preview on Your Computer
With the groundwork now laid, you're ready to download the new Android M factory images. Head to this link, then choose your device from the list to download the factory images.
Step 6: Move the Factory Images to the Platform Tools Folder
This factory image file is a set of nested archives, so extract the contents of the first archive, then you'll find another archive. Extract that one as well, then you'll find a folder.

Head into this folder, then extract the contents of the ZIP file that you'll find inside. At this point, copy all of the remaining files in this folder.
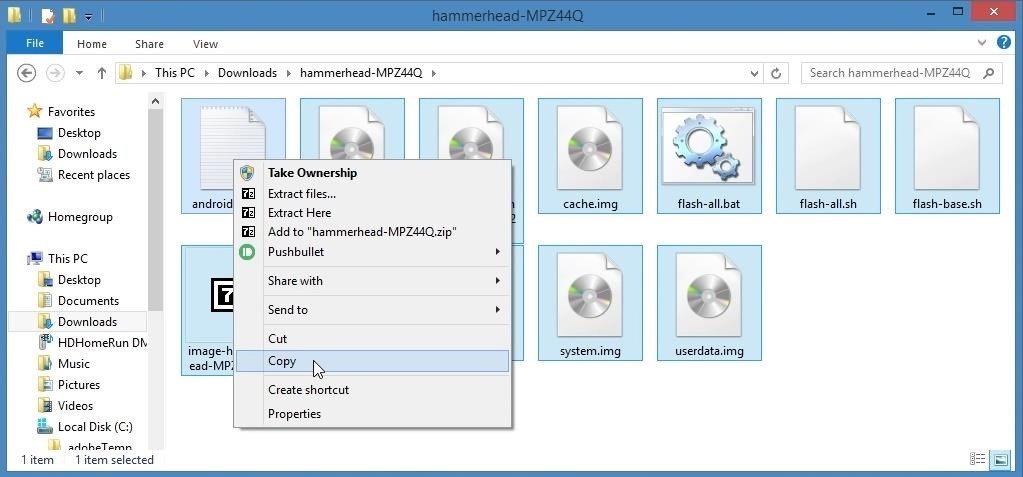
Next, head to the "android-sdk" folder, then the "platform-tools" folder inside of it. After that, paste all of the factory image files into this folder.

Step 7: Install the Android M Preview Build
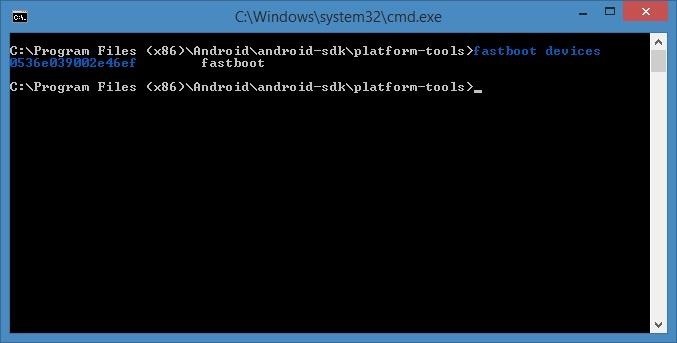
At this point, you're ready to install the Android M preview build. To begin, open a command prompt window, then change directories until you arrive at the "/android-sdk/platform-tools/" folder where you've pasted the factory images.
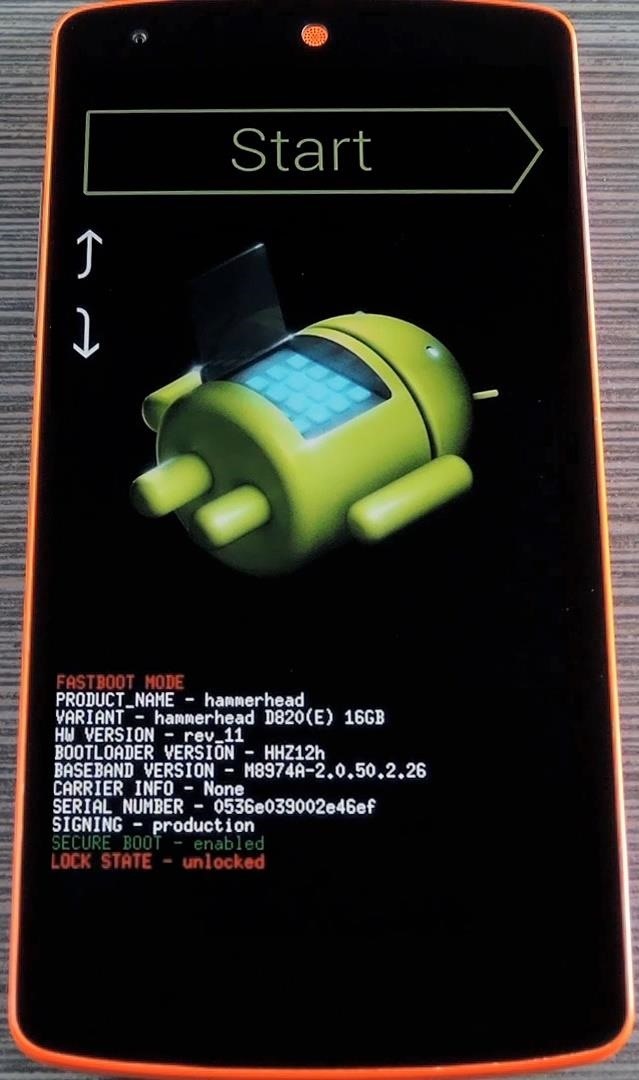
Next, type fastboot devices and hit enter to verify that your Nexus is connected properly. Note that Mac users will have to add a "./" to the beginning of all Fastboot commands (e.g. ./fastboot devices). If it spits out a series of letters and numbers in response, you're good to go.
If you haven't flashed factory images on your device before today, you'll have to unlock your Bootloader at this time. Type fastboot oem unlock and hit enter to take care of that. On your phone, press the volume up button to verify that you'd like to unlock your bootloader, then wait about a minute until the process has finished.

Now you're finally ready to flash the Android M preview build. Type flash-all and hit enter, then the process should start automatically.
Step 8: Wait for a Reboot & Enjoy Android M
It will take 5 or 10 minutes to complete, but when it's done, your phone will automatically reboot. If it doesn't, you can type fastboot reboot to do so manually.

At this point, it's safe to disconnect the USB cable and try out Android M. Some of the key features with this new release include automatic app backup, a granular permission control interface, as well as a new mobile payments system.
Step 9: Troubleshooting
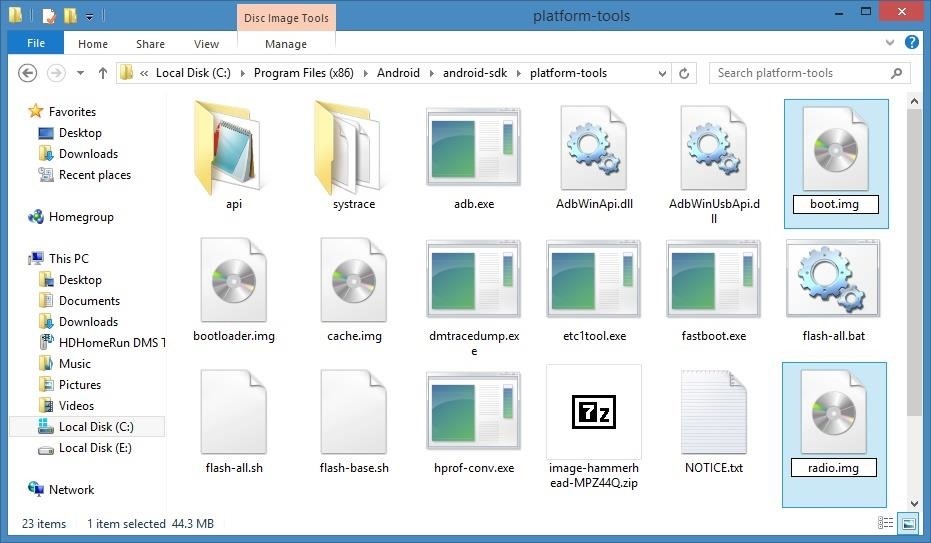
If the flash-all script is not working on your computer, you'll have to install the images manually. To make things a bit easier, head to the "platform-tools" folder where you've stored the factory images. From here, rename the "boot-xxxx-xxx.img" file to "boot.img" instead. After that, rename the "radiio-xxxx-xxx.img" file to "radio.img" in the same manner.
Next, open a terminal window and change directories to the "platform-tools" folder. From here, type fastboot flash bootloader bootloader.img and hit enter. Follow that up by typing fastboot reboot-bootloader to run the rest of these commands with the newer bootloader version.
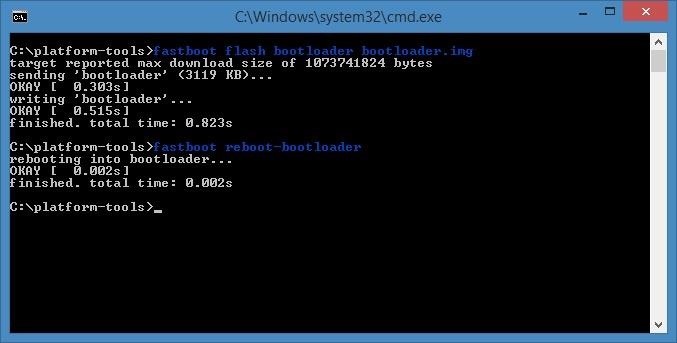
When that process has finished, type fastboot flash radio radio.img and hit enter. After that's done, enter fastboot flash boot boot.img to install the new kernel. Then, to install the new recovery image on your device, type fastboot flash recovery recovery.img and hit enter.

Finally, you can flash the system image, which makes up the core of Android. Type fastboot flash system system.img and hit enter. This one will take as much as 5 minutes to install, so wait until the process has finished before moving on.

When that's finished, use the volume buttons on your Nexus to highlight the "Start" option in the bootloader menu, then press the power button to boot your phone. Within a few minutes, Android M should greet you with its new lock screen. If you experience any minor bugs or quirks after using the manual install method, a quick factory reset should iron out all issues.
Follow Android Hacks over on Facebook and Twitter, or Gadget Hacks over on Facebook, Google+, and Twitter, for more Android tips.
Just updated your iPhone? You'll find new emoji, enhanced security, podcast transcripts, Apple Cash virtual numbers, and other useful features. There are even new additions hidden within Safari. Find out what's new and changed on your iPhone with the iOS 17.4 update.


Be the First to Comment
Share Your Thoughts